Setting Up Landscapes (Killing Floor 2): Difference between revisions
Delta-ranger (talk | contribs) No edit summary |
mNo edit summary |
||
| Line 1: | Line 1: | ||
[[Category:KF2]] | |||
== Introduction == | == Introduction == | ||
This page will give a comprehensive guide to implementing landscapes into your map and editing them. It will also provide some workarounds for some of the limitations of the current system. | This page will give a comprehensive guide to implementing landscapes into your map and editing them. It will also provide some workarounds for some of the limitations of the current system. | ||
Revision as of 22:48, 10 September 2019
Introduction
This page will give a comprehensive guide to implementing landscapes into your map and editing them. It will also provide some workarounds for some of the limitations of the current system.
In this documentation we will be using 'Landscapes' instead of 'Terrains'. Although we can refer to them representing the same thing, they are actually completely different systems within the SDK. The Terrain system is an early UDK implementation and does not contain as many features as the Landscape system and should be avoided for KF2. You can toggle the Landscape on and off by pressing 'T'.
Please refer to the technical documentation for further understanding of the system: https://api.unrealengine.com/udk/Three/Landscape.html
Step 1 - Creating a Landscape
|
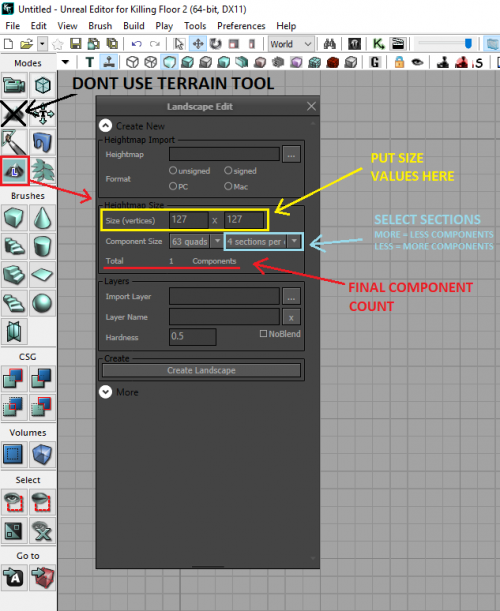
Click on the Landscape Mode. This will prompt you with options for creating Landscapes, chose what size you want and plug the corresponding values into the prompt. See Figure 1.1. The UDK documentation provides us with optimal sizes to create a landscape for the best performance in your map. You should use these and not custom sizes. Below are the recommended sizes for KF2 maps:
|
 |
Step 2 - Adding a Material
Step 3 - Editing
|
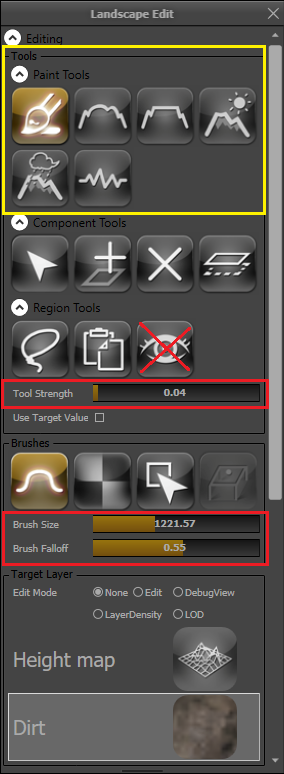
Make sure the Paint option is selected under Paint Tools, then select one of the Layers we just created. Move over to your Landscape and press Ctrl + Left Click, this will paint your Landscape with the desired layer. We can adjust the brush strength, size and falloff indicated in Figure 1.4. Editing the height of the Landscape is done in the exact same manner, we just use the 'Height map' Layer instead of the ones we created earlier. Ctrl + Left Click will add height and Ctrl + Shift + Left Click will subtract height. There are a number other tools here that we can mess with to 'Smooth' or 'Flatten' the edges and even tools to generate randomness in the ground. This should be all you need to know to use Landscapes for your Map!
|
 |
Working Around Visibility and Vertex Painting
Basically, we are going to export the Landscape mesh, edit it in our 3D modelling program of choice (I will be using Blender here) and reimporting it as a StaticMesh back into the Map. We will then use Vertex Painting to paint the mesh. Aside from just using it as a workaround for the Visibility tool bug, you can use it for small pieces of land in your map that would look more naturally formed. Eg: The snowy sections in Outpost and Krampus Lair, or the grass/courtyard in Manor. These are usually small enough to not require the extra processing used to calculate LOD for Landscapes. |
Exporting from SDK
|
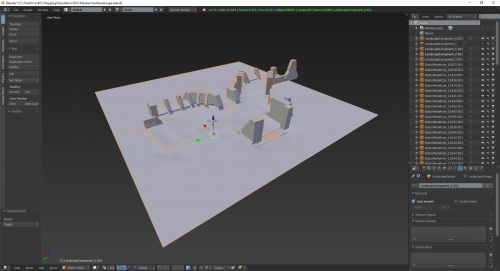
We are going to start off assuming that you have already created a landscape and have sculpted the heightmap for it. You should make the sculpt as close as you can estimate it in its final form. Any edits to the Landscape will need be done in the modelling program of choice, or restarting the below process if major edits are required. The SDK will not allow us export the landscape as a .FBX unfortunately. We will need to export it as an .OBJ. This will likely mean that our mesh scale will be much larger when we import it into Blender. However when we export, we also want to export any boundary meshes or relevant meshes that give us and indication on what we will need to remove/edit on the Landscape. Select all relevant meshes and go to File > Export > Selected Only... and export as an .OBJ. Do not include an textures/materials if it asks you, we wont need it. Afterwards just import the .OBJ into your modelling program. Figure 2.1 shows the front courtyard of KF-Desolation, the Landscape was selected plus the additional meshes that aim to cover up parts of the Landscape. |
 |
Editing the Landscape to a Mesh
|
If importing into Blender (might be the same for other programs), you will need to rescale all the meshes. Scaling it down by 0.01 gets it back into its actual mesh scale for KF2. Take note, the exported Landscape will have it's pivot point set at the origin. This can be excellent in most cases, because we can instantly export it from Blender later, and when it is placed in the map we can set its Location to (0,0,0) and it will be in the exact same position we originally exported the Landscape from. You can of course can change the pivot point in case you want to align it with a mesh or specific position instead. Depending on the sort of Landscape you created you may need to remove any duplicate vertices and weld parts together. Go ahead and do that and do whatever you need to do to the landscape such as deleting the unneeded parts of the mesh or tweaking vertices. Once you have completed it. You will need to create 3 UV channels for the Mesh:
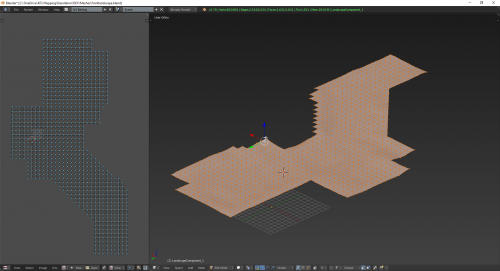
Most of time, these sections are usually flat and you can do perfectly well with a top planar projection for all the UVs. Just make sure to scale the UV0 so the textures will repeat appropriately. You do not need to create a collision mesh for this mesh as we'll change some settings after the import into UDK. Figure 2.2 shows the final edited Mesh. When you are ready (in Blender) Select your edited Landscape only and go over to File > Export > FBX (.fbx). You can leave most the parameters default, however make sure you have set the following correct settings:
When ready hit Export FBX. |
 |
Importing the new Landscape Static Mesh
|
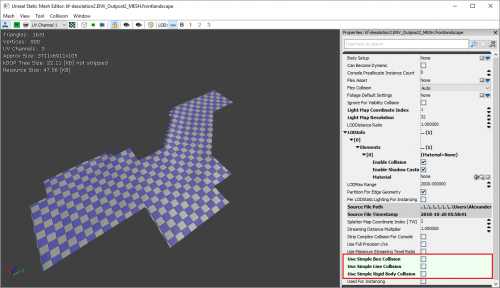
Head back into the SDK and navigate to External > KF-YourMapName within the Content Browser (if it is not here, it is probably under NewPackages instead of External). Either right click the map name or within the Browser space and select Import..., find your exported .FBX from Blender and import it in, you do not need to change any settings here (except maybe changing the name). You shouldn't get any errors when you hit OK (if a prompt says something along the line of smoothing groups make sure the export settings are set to Edge as mentioned previously). When the import is completed, you can open up the newly imported mesh and inspect to see if it is correct. To make sure we have collision for our new mesh, go to properties of the mesh and untick the following (See Figure 2.3):
You should be able to place the mesh in the scene now and adjust its position accordingly (if you use the origin pivot point, you simple need to set the Location to (0,0,0)). At this point you should inspect the mesh in the scene to see if it lost any detail or if vertex positions had changed during the edits in Blender. You can tweak the mesh pretty easily now by:
|
 |
Vertex Painting the Mesh
|
Unfortunately we don't have the luxury of using the same Landscape materials to paint our new mesh, and creating a texture for it is not a realistic or sensible thing to do for it. Our best and fastest option is to use Vertex Painting. Vertex painting is a technique where we paint Red, Green and Blue channels directly onto the mesh within the SDK. The R, G and B channels each contain their own texture/normal/look, and material simply blends them together based on their proximity to vertices; it works pretty much the same as Landscape painting with some additional limitations. The vertex painting also requires the mesh to be decently subdivided with vertices for better blending, luckily our landscape is already like this, so we do not need to change anything here. Here are some of the Vertex Paint materials in the SDK that you can use/base your material off: Material Instance Constant
Parent Materials
As with most materials, you can just choose what is best for you and edit accordingly. However some things to note:
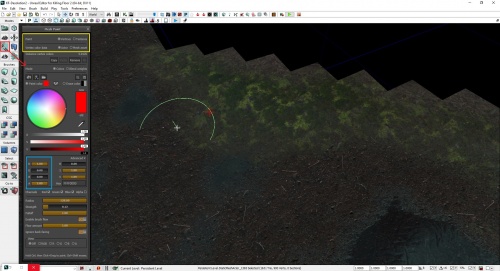
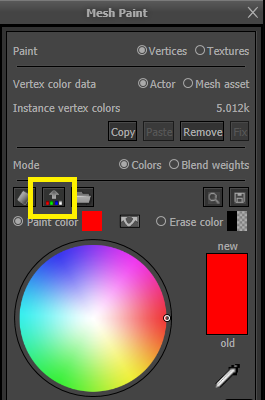
Vertex painting works much the same as Landscape painting. We first assign the material we want to use, then select the Mesh Paint Tool and in the prompt we have nearly the same options as Landscape painting. However, instead of working with Layers we now select a RGB channel to paint with. See Figure 2.4. We do not want to use the colour wheel, and instead just manually assign the channels instead. To correctly use Vertex Painting, use the settings also listed in Figure 2.4. You can turn on the Mesh Outline to help visualize where vertices are. Go to Flags Menu > Show > Advanced > Mesh Edges. If your mesh is also very large, you can scale it down to make painting faster and reset it after you have finished. Vertex Painting will be saved per instance of the mesh that it is painted on to. However if you want to save it to the actual Static Mesh within the Content Browser hit the button Copies instance vertex colors to the source mesh. See Figure 2.5. |
  |
| |||||||||||||||||||
