Getting Started with Mapping (Killing Floor 2): Difference between revisions
Delta-ranger (talk | contribs) |
Delta-ranger (talk | contribs) |
||
| Line 363: | Line 363: | ||
*SpotLights perform better than PointLights. PointLights are made up of multiple SpotLights behind the scene and are 2x more costly to use. Try and use SpotLights as much as you can (eg: Ceiling Lights).}} | *SpotLights perform better than PointLights. PointLights are made up of multiple SpotLights behind the scene and are 2x more costly to use. Try and use SpotLights as much as you can (eg: Ceiling Lights).}} | ||
===Lighting Documentation=== | ===Lighting Documentation=== | ||
'''Excellent Community Tutorial (by Seanchaoz):''' [https://www.youtube.com/watch?v= | '''Excellent Community Tutorial (by Seanchaoz):''' [https://www.youtube.com/watch?v=w4h5JSGSW2c KF2 SDK Guide - Basic Lighting Tutorial] | ||
'''Shadow System Technical Documentation:''' [[Shadow System Technical Documentation (Killing Floor 2)]] | '''Shadow System Technical Documentation:''' [[Shadow System Technical Documentation (Killing Floor 2)]] | ||
Revision as of 20:11, 10 February 2022
Introduction
This page includes a comprehensive guide on getting started with the Killing Floor 2 SDK for creating Maps and uploading them to the Steam Workshop. This page will only cover the essentials, further elaboration will need to be done at your own discretion; it is recommended that any new Level Designer should begin by looking at Official Maps and seeing how they approach particular scenarios.
Installation and First Launch
Installation
To install the SDK:
- Open up Steam, hover over 'Library' and select the 'Tools' option.
- From here locate 'Killing Floor 2 - SDK' and install it as you would any game on Steam
- Once the download is complete, launch it as you would any other game.
| If an opt-in Beta/preview is happening at the time, both the game and the SDK need to be on the same branch. Otherwise the SDK will crash on launch. i.e. If you are in the opt-in Beta for an update, the SDK also needs to be on the opt-in Beta. |
Interface Guide
| The SDK Interface is very laggy on launch - using up a lot of resources on your computer. To prevent the UI lag, simply create an empty save file or open up an existing map e.g. KF-TempMapName |
First Launch and Glance
SDK and Viewport Overview
Below is a breakdown of the core elements that you will be using in the SDK
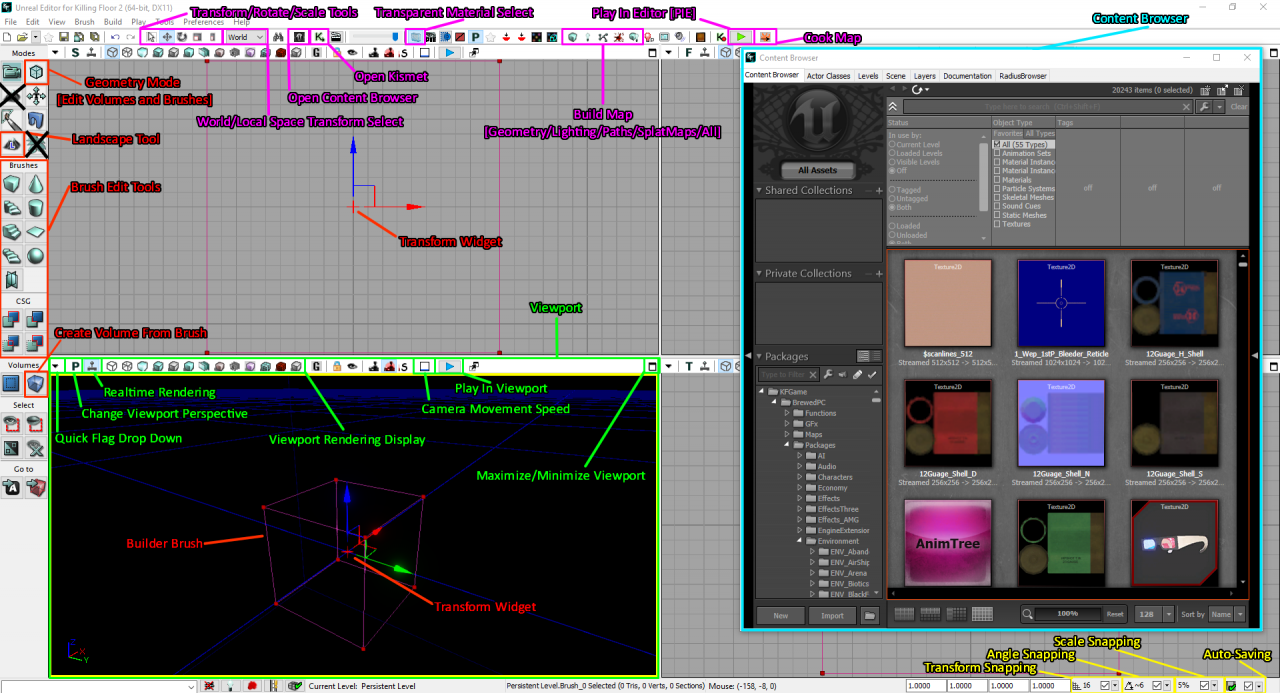
There are 2 crossed out buttons on the side menu:
- The Terrain Tool - Obsolete, use the Landscape tool instead.
- Foliage Paint Tool - Not supported, will crash the Editor when you build Lighting.
Content Browser Overview
The Content Browser is large enough to break it down in its own image. The Content Browser is where you will be grabbing all Assets (Actors, Meshes, Materials, Sounds, Decals, etc). It also serves as a tool for managing and organising your map's own individual assets, and also organising assets into Layers.
Common Hotkeys
| Hotkey | Function | Hotkey | Function |
|---|---|---|---|
| Left Click | Select actor | Spacebar | Toggle between Movement/Rotation/Scaling |
| Right Click | Open Context Menu | ~ | Toggle between World and Local space transforms |
| Ctrl + Left Click | Multiple select | N | Toggle Pathnodes |
| Right Click + Scroll Wheel | Change movement speed around viewport | P | Toggle Paths |
| Alt+Drag with Widget | Duplicate and move with widget | T | Toggle Lanscape/Terrain |
| Ctrl+Z | Undo | O | Toggle Volumes |
| Ctrl+Y | Redo | B | Toggle Builder Brush |
| H | Hide selected actors | Alt+C | Toggle Collision Wireframes |
| Shift + H | Hide all but selected actors | ] | Increase grid snap size |
| Ctrl + H | Unhide all actors | [ | Descrease grid snap size |
| G | Toggle Game View mode in viewport | Ctrl + number | Set a bookmark |
| F4 | Open actor properties | number | Snap to bookmark |
There are a lot more hotkeys for the editor, these are the main ones people usually have issue with when first starting out. You can check for others here: https://sites.google.com/site/lessonsdarrenmckinsey/udk-hotkeys
Additional Preferences
These are some additional options you may or may not want to use based on your personal preferences:
- Preferences > Flight Camera Controls
- Default is 'Use WASD for Camera Controls' - Standard FPS controls
- 'Never use WASD for Camera Controls' - KF1 Editor Controls
- Preferences > Highlight Objects Under Mouse Cursor
- Preferences > Editor Language
- View > Change Autosave Options > Autosave Interval
Your First Map
Naming
Your first map can be named anything however a Killing Floor 2 map MUST be prefixed with 'KF-'. If it isn't, it cannot be played or recognized within the game.
Your map file name should also match your map's name.
If your map name has spaces, it is common naming convention to use UpperCamelCase. Avoid using underscores or dashes to represent spaces.You should also avoid publishing a map with numbers or 'versions' at the end, this can be a pain for server owners if they want to host your map on their server.
| Map Name | Good File Name | Bad File Names |
|---|---|---|
| Burning Paris | KF-BurningParis.kfm | KF-Burning_Paris.kfm
KF-Burning-Paris.kfm KF-Paris.kfm |
| Zed's Diner | KF-ZedsDiner.kfm | KF-Zeds_Diner.kfm
KF-Zeds-Diner.kfm KF-ZesDinner.kfm KF-ZedsDinerTestingV3.kfm |
File Save Location
You can save and load your map from any location. However the best recommended location is:
C:\Users\UserName\Documents\My Games\KillingFloor2\KFGame\Unpublished\BrewedPC
The main reason is, when you plan to upload your map to the workshop, the Workshop Front-End will look specifically in only this location for files to upload. Additionally if you plan to cook your map, it needs to be in this location for it to successfully cook.
I would avoid placing your working map file under the steam game directory as well (C:\Program Files (x86)\Steam\steamapps\common\killingfloor2\KFGame\BrewedPC\Maps). This directory may confuse your editor if you plan to import, move, rename or edit assets within your map's own directory.
World Settings
World Settings can set important information for your map such as: Map Name, Map Author, Spawning Modifiers, Objectives and Collectibles, What game mode is played in the Editor, what in-game music the game uses and Optimization options.
To access it go to: View > World Properties.
For the moment, just leave most of the variables default, but you can:
- Input your map name and your user name in the appropriate areas under the 'World Info' section.
- Change the 'Default Game Type' and 'Game Type for PIE' to "KFGameInfo_Survival" under the 'Game Type' section.
Further information on World Info can be found here: Setting Up World Info (Killing Floor 2)
Important Tip Before Moving Forward
The SDK is stable for the most part, but it is not uncommon to encounter crashes at any point in its usage. In fact its something you need to be prepared for and goes without saying that:
| YOU SHOULD SAVE AS FREQUENTLY AS POSSIBLE |
While the auto-save function is useful for beginners, most users that become familiar opt to turn it off as it can interrupt workflow, bloat your game directory and also on large maps, take a long time to save.
Here are some recommended times to save:
- After any minor, moderate to large changes done in any aspect to your map
- Every 10 minutes
- If you plan to step away from the computer for a bit (e.g. going to the toilet)
- Before every Build (Lighting, Pathing, etc.)
- Planning to use or work with BSP Brushes
- Before importing new Assets (textures, meshes, sounds, etc.)
- Before placing down any newly imported Mesh
- Before moving/copying/duplicating assets in your map's directory
- Before combining meshes and/or applying collisions from the Builder Brush
After losing significant progress once or twice, saving frequently will become second habit.
Placing Assets and Props
Using the Content Browser
The Content Browser is where you will get all the meshes, textures/materials and any other assets needed to make your map. The general process of using the content browser is drag and drop or selecting and asset and right clicking in the scene to place or replace assets.
The Content Browser can be located at "View > Browser Windows > Content Browser"
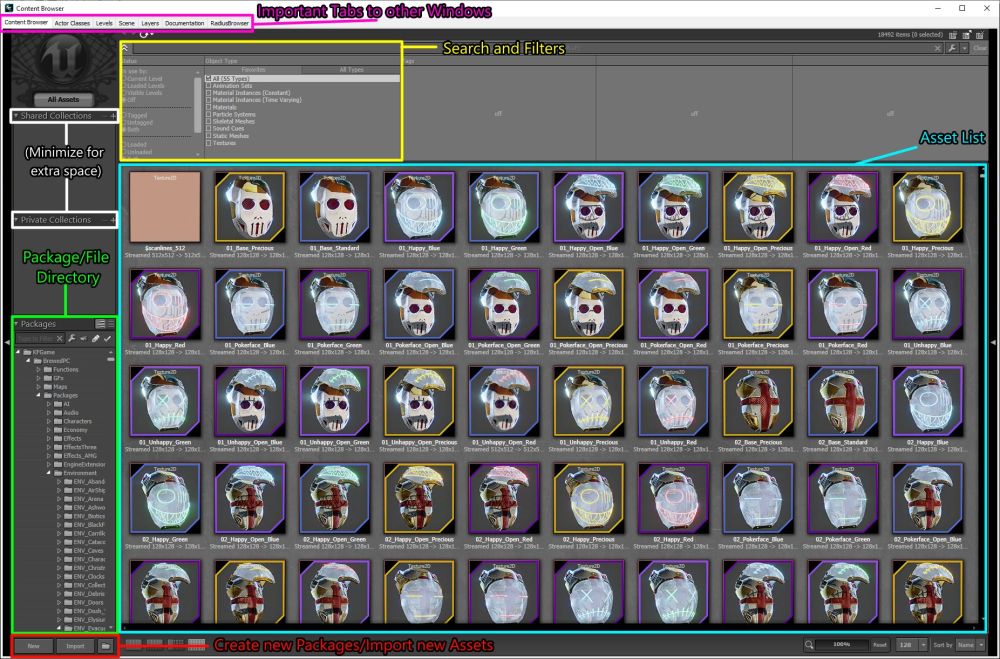
The Important Tabs to other Windows in the image above is important to remember, you can quickly navigate between important windows that will aid in understanding maps.
| Tab | Description |
|---|---|
| Content Browser | What you currently see |
| Actor Classes | All placeable classes, usually if you need a specific KFActor to place in your scene you can look for it here. |
| Levels | Will show the currently loaded level and its sublevels on official maps |
| Scene | Contains all the actors/assets in the scene. If you are looking for a specific actor and cant find it look here. |
| Layers | Works just like in Photoshop, allows you to assign specific assets to layers to organize and hide. A lot of official maps have some layers turned off (such as Skylights in Burning Paris) by default when you load the map. Simply turn them on to make the assets visible in the scene. |
Most of the assets you see are default user interface and cosmetic items that cannot really be used for mapping. Assets for mapping are located in the Package/File Directory in the "KFGame > BrewedPC > Packages > Environment" subfolders.
| Assets are not located in the "Maps" subfolder - with exception to Biolapse and Desolation assets which will be unusable for you project unless you migrate them into your map package |
To load assets you wish to use in your project right click on the "ENV_" package and right click "Fully Load". This will take a second as the SDK loads in the assets into memory. If you want to use assets from maps simply locate the corresponding "ENV_" package and load it or alternatively open the map which will also load the assets and any other assets it uses not contained in its own ENV_ package. To get started fully load the "ENV_Modular_StaticSet" package.
| It is usually not a good idea to fully load the entire "Environment" folder as it will often crash the Editor. |
Using the Modular Static Mesh Set
All maps in KF2 start from and are built from the Modular Static Mesh Set instead of BSP Brushes like in traditional Unreal Engine maps. The meshes are very carefully modelled and texture unwrapped to work with tiling textures without any seams.
You can find resources on how to use the Modular kit here:
Comprehensive Wiki Guide: Setting Up Modular Static Set (Killing Floor 2)
Community Tutorial Playlist (by Kuebic): Killing Floor 2 SDK Tutorials
C:\SteamLibrary\steamapps\common\killingfloor2\KFGame\BrewedPC\Maps\SDK\Mod_Tools_Modular_Template
C:\SteamLibrary\steamapps\common\killingfloor2\KFGame\BrewedPC\Maps\SDK\Mod_Tools_Demo_Map
Tips for working with the Modular Kit
|
| Advice from an Experienced Mapper
When you first start using the modular kit, you may feel compelled to have corners perfectly aligned with the corresponding Corner-In and Corner-Out pieces. But this is a waste of time. It is good to understand how these pieces work together, but in practice you often do not need to worry about them. When we start to add pillars, set-dressings and other assets to make the map visually interesting you will find that corners often get hidden. The time spent meticulously getting corners set up correctly is often wasted or never noticed by players; it is better to spend time elsewhere. If the corner is bare or where players will spend a lot of time, then it would be appropriate to use them correctly. But otherwise do not worry about it too much until you start to polish the map. |
Changing Materials (Textures)
|
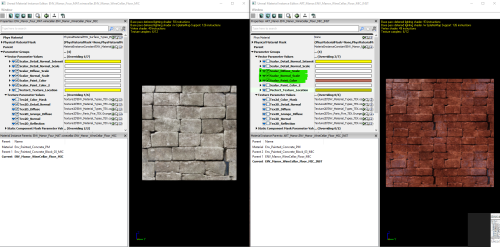
To change the look of the modular mesh pieces (or any mesh in the SDK), you apply a Material Instances onto them. A Material is a shader that combines the textures (diffuse, normal, specular, etc) so it can be applied onto a mesh within the editor. The SDK already has a large library of materials that you have access to:
You can also create custom variations of the MICs specifically for your map!
You may notice that some props have more than one slot for a material, just experiment to see which areas the materials affect.
|
 |
Creating Interesting Levels with Props
If you are just starting out, it is highly recommended that you go and spend some time looking at the official maps to see how they place props, materials and lighting around the level. You can mix and match and even copy+paste assets directly from those maps into yours. If you want a comprehensive guide on how to place props and change materials the video below does an amazing job:
Community Tutorial (by Seanchaoz): KF2 SDK - Guide to making interesting room geometry
| When you copy objects in the Editor, it copies it as plaintext. You can paste this into notepad just in case the editor crashes when you load another level. |
Creating Landscapes
| Currently Landscapes are bugged and official Materials and MIC are not working for custom maps and a workaround is required. This is a intermediate/advanced workaround and knowledge of a 3D Modelling program is required. More details are available in the link below. |
If you are just starting out, I recommend making a map out of the modular kit first. The below guide will tell you everything about how to add one to your map if you wish to procede:
Comprehensive Wiki Guide: Setting Up Landscapes (Killing Floor 2)
World Lighting
If you have just been working with the Modular Kit you have most likely been in Unlit mode (Alt+3) which is unaffected by lighting. If you go to Lit mode (Alt+4), you will notice the scene is completely black. This is because there is no lighting set up in the map yet.
Adding Ambient Light - Skylights
To get basic environmental/ambient light we need to add SkyLights.
- Go to the "Actor Classes" Tab from the Content Browser
- Navigate to "Actor > Light > SkyLight"
- Drag and drop a Skylight into the scene (Do not use the SkyLightToggleable)
If you are in Lit Mode then you will see your scene light up. As a general rule, ambient lights should be rather subtle and not as powerful as the default value of '1'. Official Maps have values that range from 0.05 (Volter Manor) to 0.15 (Outpost) for their skylights. So values between 0.01 and 0.2 are good ranges.
So lets change the value to be what is usually more acceptable for KF2 maps:
- Select the SkyLight and Press F4 to open the Properties
- Under "Light > Light Component > Light Component > Brightness" (should be open by default), change the value to something like '0.1'
- You can also change the tint of the lighting to align with your map's mood by changing the "Light Color" under the Brightness setting
- If your ceilings are too dark you can change the "Light > Light Component > Sky Light Component > Lower Brightness" to something around '0.01'
- Again you want to use very low numbers here
KF2 Maps can have a total of 2 SkyLights; 1 for Outdoors and 1 for Indoors. You can select which SkyLight affects each area by making sure in the properties that you:
- Set "Light > Light Component > Light Component > Override Auto Lighting Channels" to True/Enabled
- Selecting which Channel to affect under "Light > Light Component > Light Component > Lighting Channels"
- Without the 'Override Auto Lighting Channels' property enabled, the SkyLight will default to whatever volume it is in. We just enable it to have greater control.
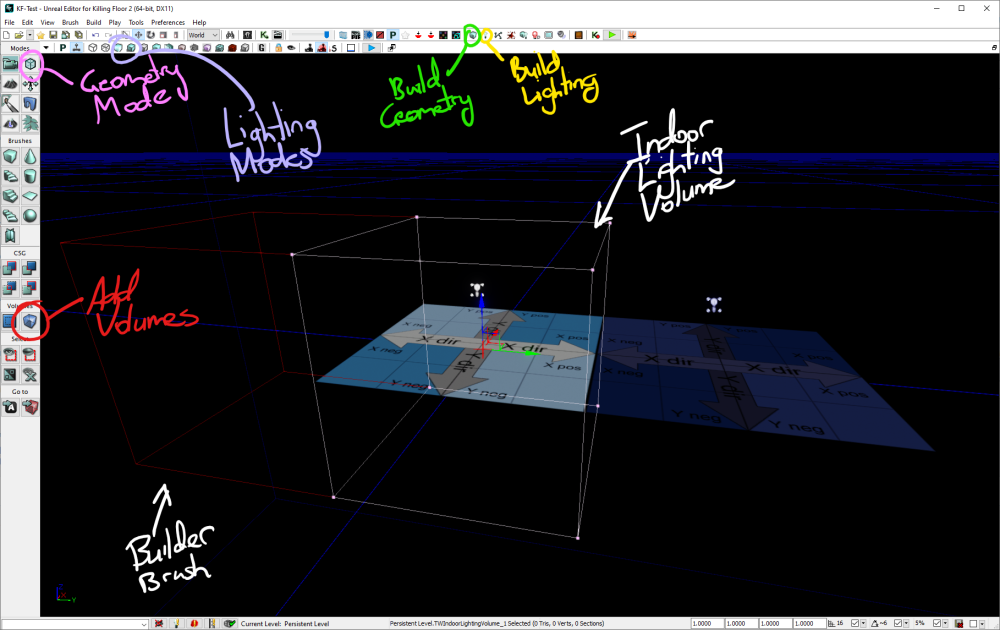
A secondary requirement for multiple Skylights is that you need a TWIndoorLightingVolume or a TWOutdoorLightingVolume. The LightingVolumes tell the editor that the assets (Props and Lights) within this volume are either Indoor or Outdoors, and will build the lighting accordingly. Since Indoors are usually contained within Outdoor environments, in most cases we just need to specify an Indoor Volume to save time.
To create lighting volumes:
- Select the Builder Brush (The Red Wireframe Cube in the scene)
- Press 'B' if you cannot so it (it may be hidden)
- Move the Builder Brush somewhere indoors to test
- On the right toolbar select "Volumes > Add Volumes" and click a TWIndoorLightingVolume (See Figure 4.1)
- Move the Builder Brush somewhere and you will see a pink cube left behind - this is your Volume
- You can change the general size of the volume by clicking Geometry Mode (Shift+2) and selecting the Volume faces and moving them where you want them
- You can shift back into Camera Mode with Shift+1
- Press the Build Geometry button to recalculate the Volume (See Figure 4.1)
- Press the Build Lighting button, a prompt will appear but just click OK
- You should notice after the game has finished building that all the meshes that intersect the Indoor Volume should be lit by the Indoor SkyLight (if you had set them up already)
General Lighting
Lighting from this point onwards is pretty easy now. There are 2 main types of light you can place into a scene. Both these lights have properties such as Brightness, Radius, Light Color which you can go creative with, you can even add flickering behaviors to them.
- PointLights - Which provide light in a sphere like radius
- You can place a light in the scene by holding 'L' and left clicking.
- SpotLights - Which provide a cone of light in the direction it is facing
- You can convert a PointLight to a SpotLight by right clicking the PointLight and selecting "Convert Light > SpotLights > SpotLight"
| LIGHTING HAS THE LARGEST IMPACT ON PERFORMANCE |
Important Tips for working with Lighting Performance:
|
Lighting Documentation
Excellent Community Tutorial (by Seanchaoz): KF2 SDK Guide - Basic Lighting Tutorial
Shadow System Technical Documentation: Shadow System Technical Documentation (Killing Floor 2)
Building (Baking and Cooking)
Basic Building
Geometry
Lighting
Paths
Splattermaps
Common Errors
Baking VS Cooking
Using the Brushes and Volumes
BSP Modifiers
Binary Space Partitioning
CSG Modifiers
Constructive Solid Geometry
Important Volumes
KFPawnBlockingVolume
KFSpawnVolume
TriggerVolume
KFReverbVolume & KFDialogEnvironmentVolume
Important Tips
Setting up Spawns and Pathing
Spawn Volumes
Pathing
Portal Spawns
Testing Your Map
What you should be Testing for
Playing in Editor
Playing in Base Game VS on a Server
Map Optimization
Map Optimization is the arguably one of the most important steps when completing a map. Aside from having good playable spaces, the map needs to perform well on all machines; maintaining stable Frames per Second (FPS). The following guide is a comprehensive list of areas that should be addressed before publishing a map. EVERY step should be evaluated and addressed as they will all add to performance.
Comprehensive Wiki Guide: Map Optimization Guide (Killing Floor 2)
Publishing to the Workshop
KFWorkshopMapSummary.iniBy default, maps natively support Survival, Weekly, and Endless game modes; If you were to upload the map directly with the Workshop Upload Tool, your map would be playable in these game modes. Objective mode is set to false so the map will not show up in selection in Objective Gamemode. To enable this you have to create and bake an additional .ini file into the map during upload. Additionally if you had a map which didn't support a game mode (eg: Progression or Holdout not being supported in Endless) this .ini will allow you to remove map selection when that game mode is active. Create a KFWorkshopMapSummary.ini within the following location: C:\Users\UserName\Documents\My Games\KillingFloor2\KFGame\Config\Config
Copy and paste the following into the KFWorkshopMapSummary.ini [KF-MAPNAME KFMapSummary] MapName=KF-MAPNAME MapAssociation=0 ScreenshotPathName=UI_MapPreview_TEX.UI_MapPreview_Placeholder bPlayableInSurvival=True bPlayableInWeekly=True bPlayableInVsSurvival=True bPlayableInEndless=True bPlayableInObjective=False
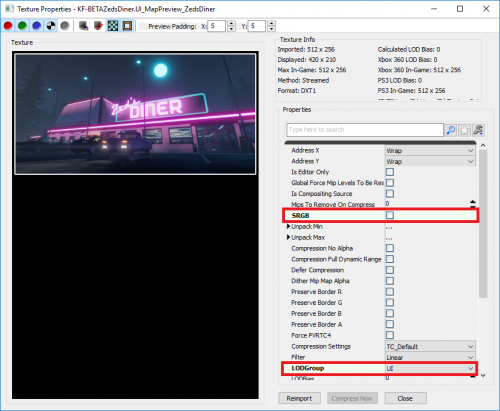
Custom Map PreviewIf you want a custom map preview you will need to include a map preview image in the map:
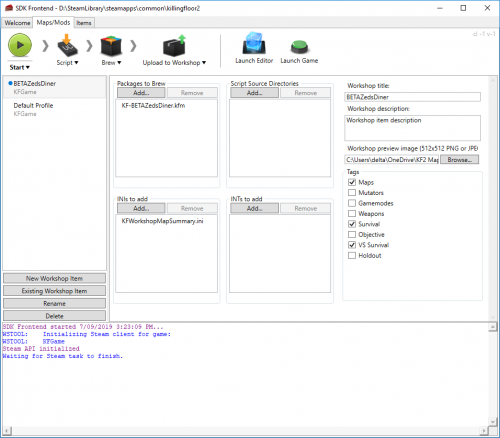
Uploading using the Workshop Upload ToolTo access the Upload Tool, open up your Steam Library Tools and right click on the Killing Floor SDK and select 'Workshop Upload Tool'. The upload steps are pretty straight forward:
Figure 11.2 shows what the Upload tool looks like with the provided .INI and MapPreview package. |
  |
Miscellaneous
| |||||||||||||||||||
