Setting Up Precomputed Visibility (Killing Floor 2): Difference between revisions
Delta-ranger (talk | contribs) mNo edit summary |
mNo edit summary |
||
| (14 intermediate revisions by 2 users not shown) | |||
| Line 1: | Line 1: | ||
[[Category:KF2]] | |||
==Introduction== | ==Introduction== | ||
This documentation aims to explain what Precomputed Visibility is, the benefits of using it, when it should be implemented and miscellaneous things to consider when approaching and tweaking it. The official documentation is important to read to grasp a stronger understanding of it (https://api.unrealengine.com/udk/Three/PrecomputedVisibility.html) however this page will tend to cover aspects not covered in the documentation and aspects more specific to Killing Floor 2. | This documentation aims to explain what Precomputed Visibility is, the benefits of using it, when it should be implemented and miscellaneous things to consider when approaching and tweaking it. The official documentation is important to read to grasp a stronger understanding of it (https://api.unrealengine.com/udk/Three/PrecomputedVisibility.html) however this page will tend to cover aspects not covered in the documentation and aspects more specific to Killing Floor 2. | ||
==What is Precomputed Visibility?== | ==What is Precomputed Visibility?== | ||
As a means to increase performance, most game engines try to reduce the amount of things rendered on the screen by using a technique called [https://api.unrealengine.com/udk/Three/VisibilityCulling.html Occlusion Culling]. In a general sense, when a user is not looking at something, or an object is fully hidden/obscured behind another, it should not be rendered as the user cannot see it. Unreal Engine 3 has an automatic system set up for this called the Dynamic Occlusion System. By default all maps made for Killing Floor 2 will use this in some form or another. This is fine in a | As a means to increase performance, most game engines try to reduce the amount of things rendered on the screen by using a technique called [https://api.unrealengine.com/udk/Three/VisibilityCulling.html Occlusion Culling]. In a general sense, when a user is not looking at something, or an object is fully hidden/obscured behind another, it should not be rendered as the user cannot see it. Unreal Engine 3 has an automatic system set up for this called the Dynamic Occlusion System. By default all maps made for Killing Floor 2 will use this in some form or another. This is fine in a generally speaking but it does require additional performance cost in determining what should be rendered and may encounter some problems and fps drops when rapidly moving the camera or moving around corners. | ||
Precomputed Visibility (PCV) aims to increase performance by statically saving the occlusion culling to the map. Doing so allows the engine to determine immediately what should be rendered instead of requiring iterations and queries used by the Dynamic system, ultimately reducing rendering time and increasing FPS. | Precomputed Visibility (PCV) aims to increase performance by statically saving the occlusion culling to the map. Doing so allows the engine to determine immediately what should be rendered instead of requiring iterations and queries used by the Dynamic system, ultimately reducing rendering time and increasing FPS. | ||
| Line 8: | Line 9: | ||
Traditionally PCV is used on mobile games and some consoles. It is used in KF2 since we use a deferred renderer instead of the front renderer typically used in Unreal engine based games. The function is to keep the draw calls in a manageable area and squeeze as much performance as possible out of the maps. | Traditionally PCV is used on mobile games and some consoles. It is used in KF2 since we use a deferred renderer instead of the front renderer typically used in Unreal engine based games. The function is to keep the draw calls in a manageable area and squeeze as much performance as possible out of the maps. | ||
It should be mentioned that | It should be mentioned that PCV is a different rendering system from the Distance Rendering you can set for individual actors in your map. Further discussion on Distance Rendering can be found [[Map Optimization Guide (Killing Floor 2)#Setting Render Distance|here]]. However both should be used to improve your map's performance. | ||
TL;DR: Its a method to increase performance in the map. | TL;DR: Its a method to increase performance in the map. | ||
| Line 18: | Line 19: | ||
* <u>'''Adding PCV to your map will ''SIGNIFICANTLY'' increase your lighting build time.'''</u> | * <u>'''Adding PCV to your map will ''SIGNIFICANTLY'' increase your lighting build time.'''</u> | ||
** Small maps which might take 1min to build lighting may now take up to 30mins to even 2 hours or more to fully build. | ** Small maps which might take 1min to build lighting may now take up to 30mins to even 2 hours or more to fully build. | ||
** Full Sized maps (Eg: Outpost, Paris, Biotics may even take up to 7-9+ hours depending on your hardware | ** Full Sized maps (Eg: Outpost, Paris, Biotics) may even take up to 7-9+ hours depending on your hardware. | ||
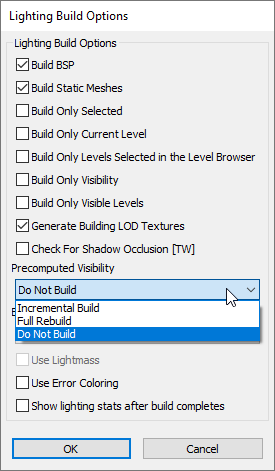
** You can, disable the requirement to build it in the lighting build options. '''See Figure 1.1'''.<br /><br /> | ** You can, disable the requirement to build it in the lighting build options. '''See Figure 1.1'''.<br /><br /> | ||
* '''<u>Hardware significantly impacts build time</u>''' | * '''<u>Hardware significantly impacts build time</u>''' | ||
** PCV build time is solely dependent on how powerful your CPU is. The more threads and higher clock your CPU has - the faster the build will be. | ** PCV build time is solely dependent on how powerful your CPU is. The more threads and higher clock your CPU has - the faster the build will be. | ||
*** Using an Outpost sized map as an example the build time can | *** Using an Outpost sized map as an example the build time can vary based on your CPU | ||
**** i7-8700k @ 4.3GHz - Looking around 7-9 hours in build time | **** i7-8700k @ 4.3GHz - Looking around 7-9 hours in build time | ||
**** i7-2700k @ 3.4GHz - Looking around 14-18 hours in build time | **** i7-2700k @ 3.4GHz - Looking around 14-18 hours in build time | ||
**** These are from my personal experience - feel free to contribute so people can get a perspective on build times. | ***** These are from my personal experience - feel free to contribute so people can get a perspective on build times. | ||
**** TWI also experience these long build times, and have mentioned they often build them overnight. | ***** TWI also experience these long build times, and have mentioned they often build them overnight. | ||
** When PCV is being built, all threads will be occupied and be running at near 100%. As the build will be fully occupying the CPU - you should not use the computer for any other major tasks. Doing so may result in the SDK crashing or longer build times. | ** When PCV is being built, all threads will be occupied and be running at near 100%. As the build will be fully occupying the CPU - you should not use the computer for any other major tasks. Doing so may result in the SDK crashing or longer build times. | ||
** As the CPU will be running at full capacity - you should closely monitor CPU and ambient temperatures as it is under a heavy load. Make sure you have sufficient cooling for your system. <br /><br /> | ** As the CPU will be running at full capacity - you should closely monitor CPU and ambient temperatures as it is under a heavy load. Make sure you have sufficient cooling for your system. <br /><br /> | ||
| Line 34: | Line 35: | ||
** This does not mean PCV is not valuable on larger maps as any improvement in performance is desirable. | ** This does not mean PCV is not valuable on larger maps as any improvement in performance is desirable. | ||
{{Important|As PCV can significantly increase the build time of a map, it is recommended that you do it as the very LAST step before you publish your map. This is when you are 100% confident you do not need to place, move or edit anymore actors/meshes to your map.}} | |||
{{Col-break|width=20%}} | {{Col-break|width=20%}} | ||
[[File:Pcvlightingbuildoptions.png|300 px|thumb|'''Figure 1.1:''' Disabling PCV in Lighting Build Options]] | [[File:Pcvlightingbuildoptions.png|300 px|thumb|'''Figure 1.1:''' Disabling PCV in Lighting Build Options]] | ||
| Line 46: | Line 47: | ||
From this point you can use the builder brush to encompass the playable areas of the map and generate 'PrecomputedVisibilityVolume's. When you build your map's lighting you will be given the option to build the PVC. Any meshes within the volume will generate 'Visibility Cells' ontop of them if they are walkable.<br /><br /> | From this point you can use the builder brush to encompass the playable areas of the map and generate 'PrecomputedVisibilityVolume's. When you build your map's lighting you will be given the option to build the PVC. Any meshes within the volume will generate 'Visibility Cells' ontop of them if they are walkable.<br /><br /> | ||
Visibility Cells are small cells that enable PCV when the players are in them. If the player is not in a Cell, PCV will not be active. As such, cells ONLY need to be generated in the playable area. It is not needed to have PCV Volumes outside the map or having the whole map encompassed in cells as it will not serve any benefit and will only increase build time. Cells are only generated on walkable surfaces and they do not stack on top of each other to fill empty space. Knowing this, we can generate volumes that are small and efficient to | Visibility Cells are small cells that enable PCV when the players are in them. If the player is not in a Cell, PCV will not be active. As such, cells ONLY need to be generated in the playable area. It is not needed to have PCV Volumes outside the map or having the whole map encompassed in cells as it will not serve any benefit and will only increase build time. Cells are only generated on walkable surfaces and they do not stack on top of each other to fill empty space. Knowing this, we can generate volumes that are small and efficient to reduce build time (see below).<br /><br /> | ||
If you have enabled and built PCV, you can view the Visibility Cells by going to ''View > Browser Windows > | If you have enabled and built PCV, you can view the Visibility Cells by going to ''View > Browser Windows > Log''. When the log window appears type ''''ShowPrecomputedVisibility''''. This will toggle the cells on in the editor.<br /><br /> | ||
{{Col-break|width=20%}} | {{Col-break|width=20%}} | ||
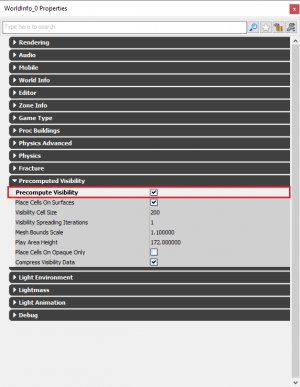
[[File:Pcvworldsettings.png|300 px|thumb|'''Figure 1.2:''' Enabling Precomputed Visibility]] | [[File:Pcvworldsettings.png|300 px|thumb|'''Figure 1.2:''' Enabling Precomputed Visibility]] | ||
| Line 56: | Line 57: | ||
There are 3 ways to shape volumes for PCV: | There are 3 ways to shape volumes for PCV: | ||
# '''<u>Encompass the Entire Map in one Volume</u>''' | #'''<u>VERY BAD: Encompass the Entire Map in one Volume</u>''' | ||
#* This is the worst and least efficient method to create PCV Volumes. The build time is enormous using this method is not recommended. | #*This is the worst and least efficient method to create PCV Volumes. The build time is enormous using this method is not recommended. | ||
#* You will also create visibility cells that are outside the playable area and never used. Essentially resulting in wasted build time. | #*You will also create visibility cells that are outside the playable area and never used. Essentially resulting in wasted build time. | ||
# '''<u>Split the map into different 'sectors' or 'fragments' based on room and general layout of the map</u>''' | #'''<u>OKAY: Split the map into different 'sectors' or 'fragments' based on room and general layout of the map</u>''' | ||
#* A much more efficient and logical approach to the volumes; shaping the volumes to conform to the shape of the rooms. Build time is better but not the best. | #*A much more efficient and logical approach to the volumes; shaping the volumes to conform to the shape of the rooms. Build time is better but not the best. | ||
#* This will have more accurate visibility cells but may still create them outside the playable area. | #*This will have more accurate visibility cells but may still create them outside the playable area and on top of ceilings the player will never be in. | ||
# '''<u>Use multiple small volumes to encompass the entire playable area of the map.</u>''' | #'''<u>BEST: Use multiple small volumes to encompass the entire playable area of the map.</u>''' | ||
#* This will result in the fastest build times | #*This will result in the fastest build times | ||
#* This will also provide more accurate visibility cells as you are not encompassing large areas. | #*This will also provide more accurate visibility cells as you are not encompassing large areas. | ||
#* '''''This is the best option | #*'''''This is the best option to start off with initially'''''<br /> | ||
The Official maps do not have a standard for how volumes are set up; different maps use all the different options. This does not mean it is the 'best' practice because it is in the Official maps. TWI have stated they use Option 2 as Option 3 may cause undesirable culling in some locations; however through my own testing, areas with undesirable culling are not fixed by encompassing affected area in one larger volume, it is usually a result of something different. Basically there is no real benefit to using Option 2 over Option 3. | |||
{{Note|Regardless of what method you use, theoretically the performance will be same across the board. Therefore it is in your's and the computer's best interest to utilize Option 3 initially due to smaller build times, and if any undesirable culling occurs utilize option 2 in those areas. }} | |||
Below are the results of carrying out PCV builds using the 3 methods on [https://steamcommunity.com/sharedfiles/filedetails/?id=1102122008 Zed's Diner] with an i7 8700k @ 4.3GHz: | Below are the results of carrying out PCV builds using the 3 methods on [https://steamcommunity.com/sharedfiles/filedetails/?id=1102122008 Zed's Diner] with an i7 8700k @ 4.3GHz: | ||
{| class="wikitable" | {| class="wikitable" | ||
|- | |- | ||
! scope="col" style="width: 10%"| | ! scope="col" style="width: 10%" | | ||
! scope="col" style="width: 30%"| 1. Single Volume Encompassing Whole Map | ! scope="col" style="width: 30%" |1. Single Volume Encompassing Whole Map | ||
! scope="col" style="width: 30%"| 2. Fitted | ! scope="col" style="width: 30%" |2. Fitted Volumes to Playable Area | ||
! scope="col" style="width: 30%"| 3. Multiple Volumes within Playable | ! scope="col" style="width: 30%" |3. Multiple Small Volumes within Playable Area | ||
|- | |- | ||
! scope="row"| Image | ! scope="row" |Image | ||
| [[File:Pcve1.jpg|400 px|thumb|center]] | |[[File:Pcve1.jpg|400 px|thumb|center]] | ||
| [[File:Pcv2.jpg|400 px|thumb|center]] | |[[File:Pcv2.jpg|400 px|thumb|center]] | ||
| [[File: | |[[File:Pcv3.jpg|400 px|thumb|center]] | ||
|- | |- | ||
! scope="row"| Description | ! scope="row" |Description | ||
| 1 giant volume encompassing a majority of the map. [https://wiki.killingfloor2.com/index.php?title=File:PcvE1progress.png After 4:37 hours this was the progress bar.] At this point I quit the build as it would be estimated to take too long. | |1 giant volume encompassing a majority of the map. [https://wiki.killingfloor2.com/index.php?title=File:PcvE1progress.png After 4:37 hours this was the progress bar.] At this point I quit the build as it would be estimated to take too long. | ||
| 4 medium volumes that were fitted to the playable area of the map split up into different 'zones' of the map | |4 medium volumes that were fitted to the playable area of the map split up into different 'zones' of the map | ||
| | |102 small volumes (640 Width x 1600 Length x 640 Height) encompassing only the playable area. | ||
|- | |- | ||
! scope="row"| Build Time | ! scope="row" |Build Time | ||
| Estimated 50+ | |Estimated 50+ hours | ||
| | |1:11:49 hours | ||
| | |1:03:21 hours | ||
|} | |} | ||
As an additional example for build time, [https://steamcommunity.com/sharedfiles/filedetails/?id=1503129313 Desolation] which is approximately the same size and mesh density as Outpost took 9:16:58 hours with Option 2, '''and took 7:15:19 hours with Option 3; ''<u>Shaving a significant 2 hours off the build time.</u>''''' | |||
==Debugging and Troubleshooting== | ==Debugging and Troubleshooting== | ||
{{Col-begin}} | |||
{{Col-break|width=70%}} | |||
Make sure your Log window is available by selecting ''View > Browser Windows > Log'', you can use the following commands to evaluate and debug PCV: | |||
#Type 'stat fps' into the Log Window to enable the fps counter in the viewport | |||
#Type 'stat initviews' in the Log window | |||
#In the view port, Hit 'Shift+L' to bring up the InitViews stats. These stats contain the information we are interested in about PCV.<br /><br /> | |||
The two lines we are concerned with are 'Statically Occluded Primitives' and 'Occluded Primitives'. '''See Figure 1.3''': | |||
*'''Occluded Primitives''' shows how many primitives were determined invisible by the Dynamic Occlusion System used by default | |||
*'''Statically Occluded Primitives''' shows how many primitives were culled using PCV while the user is in a Visibility Cell.<br /><br /> | |||
Ideally we are interested in how much performance we gain from it, to see this: | |||
#Play in the Editor (PIE) or play in the viewport | |||
#Press ~ to open the console and type 'ToggleOcclusion' to toggle off the Dynamic Occlusion System | |||
#You can then toggle the PCV by typing 'TogglePrecomputedVisibility' | |||
From a very basic performance look, we are interested in FPS changes as we toggle PCV. In the case of the above example of Zed's Diner. I was getting anywhere from 1-3 & 5-7 additional frames with PCV turned on depending on the area I was in. However, as mentioned earlier PCV does not perform that well on open maps/areas; which Zed's Diner is. Either way, we have noticed an increased in FPS performance, which will more likely be better when we run the map in game. | |||
The UDK Documentations states: | |||
<blockquote>''"When precomputed visibility is working well, 'Statically occluded primitives' should be within 50-80% of 'Occluded primitives'. Precomputed visibility culls less objects because it stores information for large cells and doesn't handle dynamic or masked occluders (see the Limitations section). Note: this stat is most reliable in game or PIE, and not in the editor, due to all the debug stuff that gets drawn in the editor." ''</blockquote> | |||
{{Col-break|width=30%}} | |||
[[File:Pcvresults.jpg|500 px|thumb|'''Figure 1.3:''' PCV Results within InitViews stats]] | |||
{{Col-end}} | |||
===Miscellaneous=== | ===Miscellaneous=== | ||
*PCV will automatically detect materials with a Blend Mode of 'BLEND_Translucent' (see-through materials) and not cull objects when looking through something like glass. However it is not reliable, always double check to make sure that the final build doesn't mess with hiding some meshes or lights that shouldn't be hidden. | |||
*In a similar sense, meshes that are 'Hidden in Game' and are not translucent will still be viewed as a visibility blocker. This can result in things being culled that shouldnt be when in game - simple solution is to use a BLEND_Translucent material so PCV acts as if it is glass (eg: get the standard glass material, swap the textures and give it 100% opacity to make it look opaque/solid). | *PCV will automatically detect materials with a Blend Mode of 'BLEND_Translucent' (see-through materials) and not cull objects when looking through something like glass. However it is not reliable, always double check to make sure that the final build doesn't mess with hiding some meshes or lights that shouldn't be hidden. | ||
*If there is a part of the map with undesirable culling I recommend copy and pasting only that segment of the map into a new map and do a full rebuild of the PCV. This should hopefully only take a couple of minutes instead of hours to change and test possible options. EG: 5-10 min build vs Hours. Once you find a solution just copy it into your actual map. | *In a similar sense, meshes that are 'Hidden in Game' and are not translucent will still be viewed as a visibility blocker. This can result in things being culled that shouldnt be when in game - simple solution is to use a BLEND_Translucent material so PCV acts as if it is glass (eg: get the standard glass material, swap the textures and give it 100% opacity to make it look opaque/solid). | ||
* | *If there is a part of the map with undesirable culling I recommend copy and pasting only that segment of the map into a new map, testing different options for PCV volumes and do a full rebuild of the PCV. This should hopefully only take a couple of minutes instead of hours to change and test possible options. EG: 5-10 min build vs Hours. Once you find a solution just copy it into your actual map. | ||
*Precomputed Visibility Override Volumes do not work, if anyone has managed to successfully implement them, please provide some details. | |||
*Do not use the 'Incremental Build' build option - the results are not accurate and are full of errors. Only stick with 'Full Rebuild' | *Do not use the 'Incremental Build' build option - the results are not accurate and are full of errors. Only stick with 'Full Rebuild' | ||
| Line 111: | Line 134: | ||
[https://steamcommunity.com/sharedfiles/filedetails/?id=805273408 Steam Guide - Precomputed Visibility: What is it? Why use it? By Kill Master] | [https://steamcommunity.com/sharedfiles/filedetails/?id=805273408 Steam Guide - Precomputed Visibility: What is it? Why use it? By Kill Master] | ||
{{KF2SDKNavBox}} | |||
Latest revision as of 22:48, 10 September 2019
Introduction
This documentation aims to explain what Precomputed Visibility is, the benefits of using it, when it should be implemented and miscellaneous things to consider when approaching and tweaking it. The official documentation is important to read to grasp a stronger understanding of it (https://api.unrealengine.com/udk/Three/PrecomputedVisibility.html) however this page will tend to cover aspects not covered in the documentation and aspects more specific to Killing Floor 2.
What is Precomputed Visibility?
As a means to increase performance, most game engines try to reduce the amount of things rendered on the screen by using a technique called Occlusion Culling. In a general sense, when a user is not looking at something, or an object is fully hidden/obscured behind another, it should not be rendered as the user cannot see it. Unreal Engine 3 has an automatic system set up for this called the Dynamic Occlusion System. By default all maps made for Killing Floor 2 will use this in some form or another. This is fine in a generally speaking but it does require additional performance cost in determining what should be rendered and may encounter some problems and fps drops when rapidly moving the camera or moving around corners.
Precomputed Visibility (PCV) aims to increase performance by statically saving the occlusion culling to the map. Doing so allows the engine to determine immediately what should be rendered instead of requiring iterations and queries used by the Dynamic system, ultimately reducing rendering time and increasing FPS.
Traditionally PCV is used on mobile games and some consoles. It is used in KF2 since we use a deferred renderer instead of the front renderer typically used in Unreal engine based games. The function is to keep the draw calls in a manageable area and squeeze as much performance as possible out of the maps.
It should be mentioned that PCV is a different rendering system from the Distance Rendering you can set for individual actors in your map. Further discussion on Distance Rendering can be found here. However both should be used to improve your map's performance.
TL;DR: Its a method to increase performance in the map.
Should I and When Should I?
How do I set it up?
|
To enable PCV go to View > World Properties. From here expand the Precomputed Visibility Tab and enable the option 'Precompute Visibility'. See Figure 1.2. You do not need to edit any of the values here. From this point you can use the builder brush to encompass the playable areas of the map and generate 'PrecomputedVisibilityVolume's. When you build your map's lighting you will be given the option to build the PVC. Any meshes within the volume will generate 'Visibility Cells' ontop of them if they are walkable. Visibility Cells are small cells that enable PCV when the players are in them. If the player is not in a Cell, PCV will not be active. As such, cells ONLY need to be generated in the playable area. It is not needed to have PCV Volumes outside the map or having the whole map encompassed in cells as it will not serve any benefit and will only increase build time. Cells are only generated on walkable surfaces and they do not stack on top of each other to fill empty space. Knowing this, we can generate volumes that are small and efficient to reduce build time (see below). If you have enabled and built PCV, you can view the Visibility Cells by going to View > Browser Windows > Log. When the log window appears type 'ShowPrecomputedVisibility'. This will toggle the cells on in the editor. |
 |
Best Practices for Volumes
There are 3 ways to shape volumes for PCV:
- VERY BAD: Encompass the Entire Map in one Volume
- This is the worst and least efficient method to create PCV Volumes. The build time is enormous using this method is not recommended.
- You will also create visibility cells that are outside the playable area and never used. Essentially resulting in wasted build time.
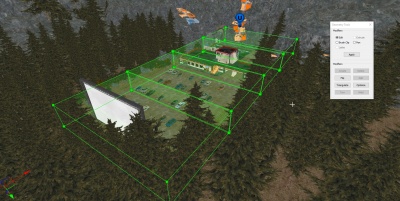
- OKAY: Split the map into different 'sectors' or 'fragments' based on room and general layout of the map
- A much more efficient and logical approach to the volumes; shaping the volumes to conform to the shape of the rooms. Build time is better but not the best.
- This will have more accurate visibility cells but may still create them outside the playable area and on top of ceilings the player will never be in.
- BEST: Use multiple small volumes to encompass the entire playable area of the map.
- This will result in the fastest build times
- This will also provide more accurate visibility cells as you are not encompassing large areas.
- This is the best option to start off with initially
The Official maps do not have a standard for how volumes are set up; different maps use all the different options. This does not mean it is the 'best' practice because it is in the Official maps. TWI have stated they use Option 2 as Option 3 may cause undesirable culling in some locations; however through my own testing, areas with undesirable culling are not fixed by encompassing affected area in one larger volume, it is usually a result of something different. Basically there is no real benefit to using Option 2 over Option 3.
| Regardless of what method you use, theoretically the performance will be same across the board. Therefore it is in your's and the computer's best interest to utilize Option 3 initially due to smaller build times, and if any undesirable culling occurs utilize option 2 in those areas. |
Below are the results of carrying out PCV builds using the 3 methods on Zed's Diner with an i7 8700k @ 4.3GHz:
| 1. Single Volume Encompassing Whole Map | 2. Fitted Volumes to Playable Area | 3. Multiple Small Volumes within Playable Area | |
|---|---|---|---|
| Image | 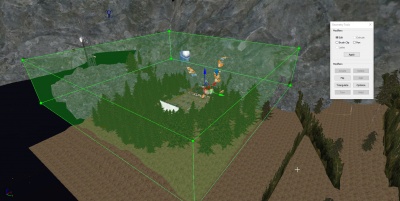 |
 |
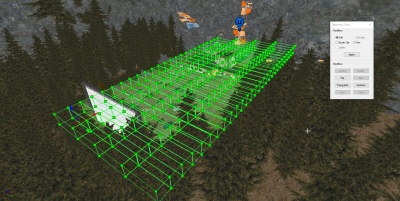 |
| Description | 1 giant volume encompassing a majority of the map. After 4:37 hours this was the progress bar. At this point I quit the build as it would be estimated to take too long. | 4 medium volumes that were fitted to the playable area of the map split up into different 'zones' of the map | 102 small volumes (640 Width x 1600 Length x 640 Height) encompassing only the playable area. |
| Build Time | Estimated 50+ hours | 1:11:49 hours | 1:03:21 hours |
As an additional example for build time, Desolation which is approximately the same size and mesh density as Outpost took 9:16:58 hours with Option 2, and took 7:15:19 hours with Option 3; Shaving a significant 2 hours off the build time.
Debugging and Troubleshooting
|
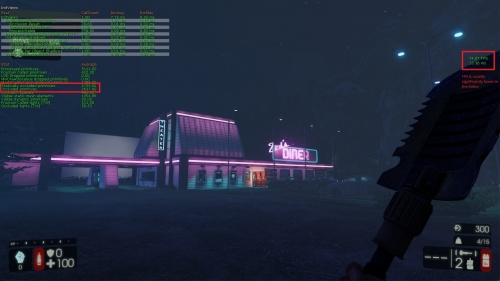
Make sure your Log window is available by selecting View > Browser Windows > Log, you can use the following commands to evaluate and debug PCV:
The two lines we are concerned with are 'Statically Occluded Primitives' and 'Occluded Primitives'. See Figure 1.3:
Ideally we are interested in how much performance we gain from it, to see this:
From a very basic performance look, we are interested in FPS changes as we toggle PCV. In the case of the above example of Zed's Diner. I was getting anywhere from 1-3 & 5-7 additional frames with PCV turned on depending on the area I was in. However, as mentioned earlier PCV does not perform that well on open maps/areas; which Zed's Diner is. Either way, we have noticed an increased in FPS performance, which will more likely be better when we run the map in game. The UDK Documentations states:
|
 |
Miscellaneous
- PCV will automatically detect materials with a Blend Mode of 'BLEND_Translucent' (see-through materials) and not cull objects when looking through something like glass. However it is not reliable, always double check to make sure that the final build doesn't mess with hiding some meshes or lights that shouldn't be hidden.
- In a similar sense, meshes that are 'Hidden in Game' and are not translucent will still be viewed as a visibility blocker. This can result in things being culled that shouldnt be when in game - simple solution is to use a BLEND_Translucent material so PCV acts as if it is glass (eg: get the standard glass material, swap the textures and give it 100% opacity to make it look opaque/solid).
- If there is a part of the map with undesirable culling I recommend copy and pasting only that segment of the map into a new map, testing different options for PCV volumes and do a full rebuild of the PCV. This should hopefully only take a couple of minutes instead of hours to change and test possible options. EG: 5-10 min build vs Hours. Once you find a solution just copy it into your actual map.
- Precomputed Visibility Override Volumes do not work, if anyone has managed to successfully implement them, please provide some details.
- Do not use the 'Incremental Build' build option - the results are not accurate and are full of errors. Only stick with 'Full Rebuild'
External Links
Official UDK Documentation - Precomputed Visibility
Steam Guide - Precomputed Visibility: What is it? Why use it? By Kill Master
| |||||||||||||||||||
