Map Optimization Guide (Killing Floor 2): Difference between revisions
Delta-ranger (talk | contribs) mNo edit summary |
Delta-ranger (talk | contribs) (Added Mesh and Material/PE Complexity Guide and Misc Tweaks/Organisation) |
||
| Line 1: | Line 1: | ||
==Introduction== | ==Introduction== | ||
This page will give a comprehensive guide to increasing the performance in your map and also optimizing the player experience; looking at such things as making smooth movement around the map, avoiding getting caught on props and general exploit fixing. Its recommended that you read through the entire guide and apply all the principles to your map before you release it on the workshop. | This page will give a comprehensive guide to increasing the performance in your map and also optimizing the player experience; looking at such things as making smooth movement around the map, avoiding getting caught on props and general exploit fixing. Its recommended that you read through the entire guide and apply all the principles to your map before you release it on the workshop. | ||
The techniques below are listed in the stages you should apply and implement them; starting from being able to apply them at anytime and ending with final/last stage tweaks before publishing a map. | |||
==Lighting and Dynamic Shadows== | ==Lighting and Dynamic Shadows== | ||
| Line 33: | Line 35: | ||
{{Col-end}} | {{Col-end}} | ||
== | ==Mesh Density and Material & Particle Effect Complexity== | ||
{{Col-begin}} | |||
{{Col-break|width=70%}} | |||
Although there really aren't any guidelines for using meshes and materials, mappers should still take notice things such as the amount of tris in meshes and the complexity of materials applied. It can be very easy to take good looking complex meshes for granted and place them generously around the map, resulting in clusters of high tri densities that may impact performance when looking at them. I would say anything with a tri count in the 3,000 or more range should be used with regards to their complexity; reducing frequency as the tri count increases. | |||
The same thing can be said for materials and you should be aware that the following sort of materials may impact performance when there are high densities of them: | |||
*Transparent Materials like glass, water, smoke and foliage/leaves | |||
*Materials that move and displace the mesh like leaves (in the wind) and water | |||
*Animated and moving textures within the material like fire or smoke | |||
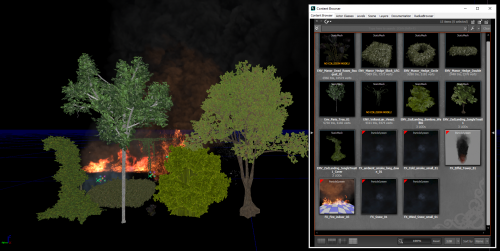
Tree and foliage assets fall into both of these categories (especially Zed Landing assets). Tree meshes usually contain a large number of tris to displace leaves. These leaves also usually use transparent and displacement materials. When coupled together, small clusters of trees and foliage can immediately hit performance. This can be very easy to do since they can look decent placed anywhere so we can get carried away placing many different combinations of trees and foliage. This isn't so much saying "Never use them", more or less just use them wisely; if you can turn the coverage of some foliage from 5 meshes to 2-3 (or even 4) without any major visual impact, definitely do it. | |||
The exact same thing can be said about particle effects, especially those that create fog, smoke or use transparent textures/materials. An overuse and mishandling of them can quickly lead to poor scene performance. | |||
'''Figure 2.1''' Shows some examples of assets that when '''overused''' ''may'' see a performance hit in your scene, these mainly contain high tri counts or/and use complex materials. | |||
{{Col-break|width=30%}} | |||
[[File:MeshComplexity.png|500 px|thumb|'''Figure 2.1:''' Deceptively Complex Assets]] | |||
{{Col-end}} | |||
==Movement Optimization== | |||
===General Player Movement=== | |||
===Looking For Map Exploits=== | |||
== | ===Fixing Spawns and Pathing=== | ||
==Mesh Merging== | ==Mesh Merging== | ||
| Line 60: | Line 83: | ||
'''Community Video (by Seanchaoz):''' [https://www.youtube.com/watch?v=bO32vB1yLC0 KF2 SDK Tutorial - Combined Meshes] | '''Community Video (by Seanchaoz):''' [https://www.youtube.com/watch?v=bO32vB1yLC0 KF2 SDK Tutorial - Combined Meshes] | ||
==Setting Render Distance== | |||
TODO | |||
==Splatter Map Resolution Standardization== | ==Splatter Map Resolution Standardization== | ||
{{Col-begin}} | {{Col-begin}} | ||
{{Col-break|width= | {{Col-break|width=70%}} | ||
===What and Why?=== | ===What and Why?=== | ||
Towards the end of the creation process and after mesh merging you should take some time to address the Splatter Maps around the map. Having consistent Splat Maps around your map gives it an additional layer of polish; as during gameplay the map will be sprayed with blood on all sorts of walls, floors, props and ceilings and we want to make sure the scaling and presentation of the blood is consistent. | Towards the end of the creation process and '''after''' mesh merging you should take some time to address the Splatter Maps around the map. Having consistent Splat Maps around your map gives it an additional layer of polish; as during gameplay the map will be sprayed with blood on all sorts of walls, floors, props and ceilings and we want to make sure the scaling and presentation of the blood is consistent. | ||
===How?=== | ===How?=== | ||
You can check the consistency of Splat Maps on your map by selecting the ''SplatterMap Density [TW]'' View (yellow) and you can rebuild them by selecting ''Build Splatter Maps [TW]'' (red) shown in '''Figure | You can check the consistency of Splat Maps on your map by selecting the ''SplatterMap Density [TW]'' View (yellow) and you can rebuild them by selecting ''Build Splatter Maps [TW]'' (red) shown in '''Figure 6.1'''. | ||
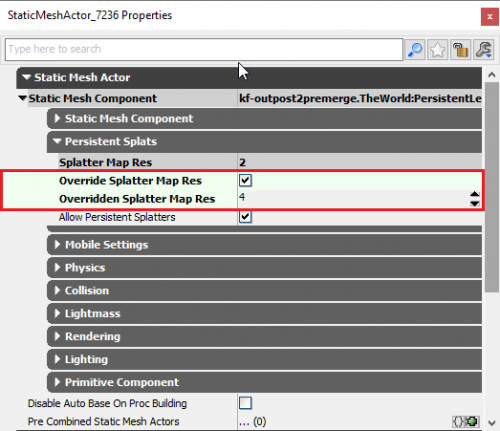
You can set the Splat Map resolution on any static mesh by opening the properties and enabling 'Override Splatter Map Res' and Setting the value for 'Overridden Splatter Map Res' under ''Static Mesh Component > Persistent Splats''. '''See Figure | You can set the Splat Map resolution on any static mesh by opening the properties and enabling 'Override Splatter Map Res' and Setting the value for 'Overridden Splatter Map Res' under ''Static Mesh Component > Persistent Splats''. '''See Figure 6.2'''. | ||
You should aim to keep all the static mesh object splatter maps consistent. It can be a time consuming process of selecting, tweaking and rebuilding splats but the end result provides a much more professional looking map when it is covered in that delicious KF2 blood. | You should aim to keep all the static mesh object splatter maps consistent. It can be a time consuming process of selecting, tweaking and rebuilding splats but the end result provides a much more professional looking map when it is covered in that delicious KF2 blood. | ||
| Line 82: | Line 108: | ||
===Examples=== | ===Examples=== | ||
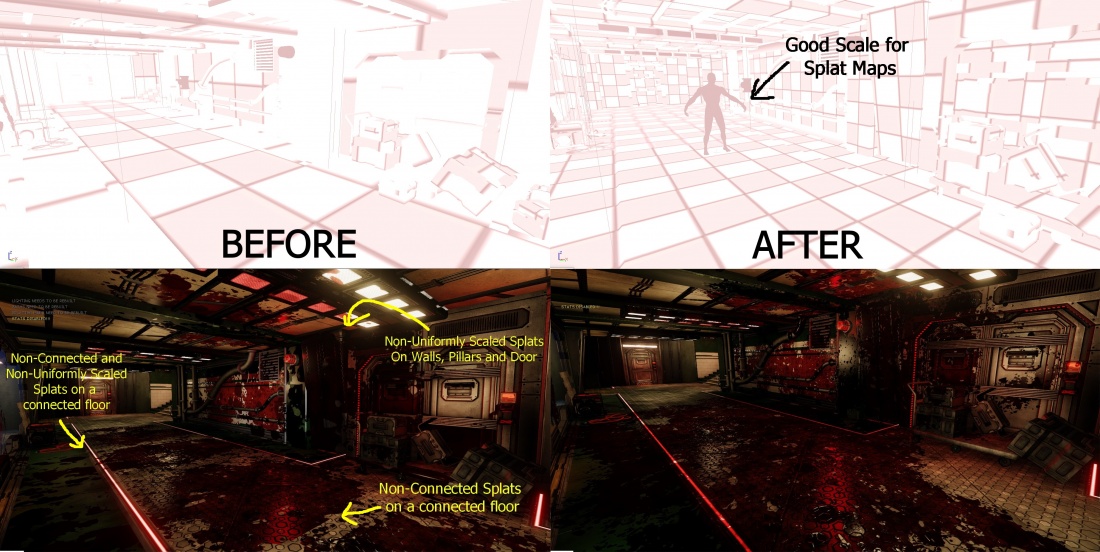
'''Figure | '''Figure 6.3''' shows a before and after of Splatter Map Resolution Standardization. | ||
A good scale for Splat Maps is also present in the image. You can gauge and check the scale in comparison to Zeds by pressing '\' which will hover a clot around the map. Generally Splat Maps should be able to fit a single clot within them | A good scale for Splat Maps is also present in the image. You can gauge and check the scale in comparison to Zeds by pressing '\' which will hover a clot around the map. Generally Splat Maps should be able to fit a single clot within them | ||
[[File:Splatmapcomparison.jpg| | [[File:Splatmapcomparison.jpg|1100 px|thumb|left|'''Figure 6.3:''' Splatter Map Standardization Before and After]]<br clear=all> | ||
{{Col-break|width= | {{Col-break|width=30%}} | ||
[[File:SplatmapOption.png| | [[File:SplatmapOption.png|500 px|thumb|'''Figure 6.1:''' Splatter Map View and Building Splatter Map Buttons]] | ||
[[File:SplatMapOverride.png| | [[File:SplatMapOverride.png|500 px|thumb|'''Figure 6.2:''' Splatter Map Override Properties]] | ||
{{Col-end}} | {{Col-end}} | ||
==Precomputed Visibility== | ==Precomputed Visibility== | ||
| Line 99: | Line 126: | ||
'''Comprehensive Wiki Guide:''' [[Setting Up Precomputed Visibility (Killing Floor 2)]] | '''Comprehensive Wiki Guide:''' [[Setting Up Precomputed Visibility (Killing Floor 2)]] | ||
== | ==Final Words== | ||
All the above techniques are used in Official KF2 maps to optimize the player experience. If you wish to make official quality maps that people would like to play and have good performance, you should implement all techniques discussed on this page. | |||
It may seem like a lot to do, and frankly it is, but this is game development and we have a responsibility to deliver the best experience we can for the players. Personally I find a certain charm and rewarding quality when you see the performance of your map increase, even by a little bit. <br /><br /> | |||
Best of luck to all those who strive for the best out of their work! | |||
-Delta | |||
Revision as of 11:31, 7 October 2018
Introduction
This page will give a comprehensive guide to increasing the performance in your map and also optimizing the player experience; looking at such things as making smooth movement around the map, avoiding getting caught on props and general exploit fixing. Its recommended that you read through the entire guide and apply all the principles to your map before you release it on the workshop.
The techniques below are listed in the stages you should apply and implement them; starting from being able to apply them at anytime and ending with final/last stage tweaks before publishing a map.
Lighting and Dynamic Shadows
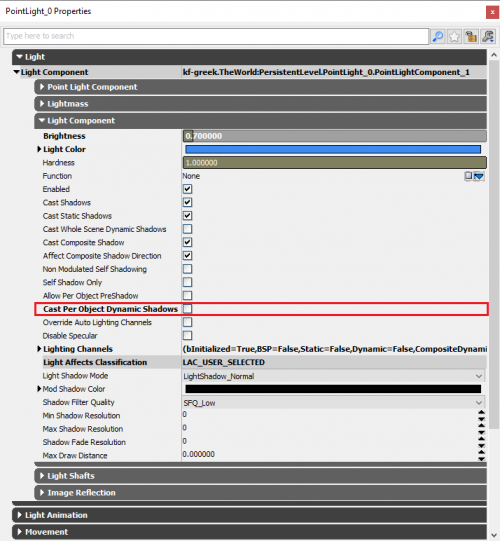
PointLights VS SpotLightsSpotLights perform better than PointLights. SpotLights cast in 1 particular direction, While Pointlights have to cast multiple SpotLights in directions around the entire radius of the sphere (PointLights are 2x more costly in performance; however in saying this - you are able to have many combinations of PointLights and SpotLights without too much of a performance hit). Both lights are affected by the size of the Radius that they have - as you would expect, having a larger radius has a larger impact on performance. It is recommended to adjust the radius size to be just enough to get the desired effect and not to be over generous. You may be able to achieve the same lighting intent with a smaller radius and larger brightness. The PointLight PitfallOne trap a lot of new maps fall into is the unintended over-use and mishandling of dynamic shadows with PointLights. This is not entirely the level designers fault as one particular variable: Cast Per Object Dynamic Shadows is enabled by default. This is located under the PointLight Properties > Light Component > Light Component. See Figure 1.1. You always want to make sure that this variable is DISABLED for any PointLights in your map. NEVER use dynamic shadows with PointLights. Dynamic Shadows should only be reserved for SpotLights. This particular option may not seem problematic when playing in the editor, this is because the performance hit only occurs when there are many actors (Zeds/Players) within the light's radius. Each of these actors will be casting dynamics shadows, which are already quite demanding. During gameplay, you may see huge fluctuations with your FPS based on the action/number of zeds present in the screen within the vicinity of these lights. This performance hit can be magnified quite significantly when you end up having a cluster of PointLights also casting dynamic shadows in the same area. You can easily check and disable this variable on all PointLights on your map by:
Doing this trick alone should see a significant increase in performance if they were previously enabled. SpotLights casting Dynamic ShadowsAs mentioned previously, Dynamic Shadows are quite an intensive features to use in a map. Their performance impact is proportional to the complexity of the geometry of the map and the amount of moving actors (Players and Zeds) that they cast shadows from. Poor performance can be magnified if there are a cluster of SpotLights that cast Dynamic Shadows as well. It's recommended to use them sparingly and to avoid clustering them together. Try to use them to accent certain parts of the map opposed to making all SpotLights cast them, as they can have larger visual impact. (eg: Casting shadows from car high-beams/floodlights, using them on alarm systems or around a fireplace - usually locations/lights that are bold and already stick out). |
 |
Mesh Density and Material & Particle Effect Complexity
Movement Optimization
General Player Movement
Looking For Map Exploits
Fixing Spawns and Pathing
Mesh Merging
What and Why?
Mesh merging is a step that all level designers should do to their maps as they approach completion. It aims to further enhance the look of your map by combining multiple static meshes on the same plane/axis so that:
- Light Maps generated by the Engine will be consistent and look better
- Splat Maps will also look connected and part of the same object (eg the same floor) instead of being disconnected
It also has the added benefits of increasing performance by:
- Reducing the amount of drawcalls required to render the object
- Simplifying and reducing collision calculations
This is because you are now calculating collisions and drawcalls for 1 mesh instead of say 4, 8, 20 and even up to 30+ meshes in some cases.
ALL MAPS SHOULD MERGE THEIR MESHES WHERE POSSIBLE
How?
Comprehensive Wiki Guide: Setting Up UV's and Mesh Merging (Killing Floor 2)
Community Video (by Seanchaoz): KF2 SDK Tutorial - Combined Meshes
Setting Render Distance
TODO
Splatter Map Resolution Standardization
Precomputed Visibility
What and Why?
Precomputed Visibility is a final optimization step that you can add to your map to squeeze the last amount of performance out it. Although we set the mesh and lighting render distances in a previous step, this was only one technique used to help actor culling in our map. By default the maps will use UDK's Dynamic Occlusion System, this is a fine approach in a general sense but it can have a performance cost with calculating what should be culled dynamically while playing. Utilizing Precomputed Visibility will allow us to statically save some occlusion culling around the map to increase performance.
How?
Comprehensive Wiki Guide: Setting Up Precomputed Visibility (Killing Floor 2)
Final Words
All the above techniques are used in Official KF2 maps to optimize the player experience. If you wish to make official quality maps that people would like to play and have good performance, you should implement all techniques discussed on this page.
It may seem like a lot to do, and frankly it is, but this is game development and we have a responsibility to deliver the best experience we can for the players. Personally I find a certain charm and rewarding quality when you see the performance of your map increase, even by a little bit.
Best of luck to all those who strive for the best out of their work! -Delta


