Map Optimization Guide (Killing Floor 2): Difference between revisions
Delta-ranger (talk | contribs) mNo edit summary |
Delta-ranger (talk | contribs) (Added some basic stuff for movement optimization) |
||
| Line 56: | Line 56: | ||
==Movement Optimization== | ==Movement Optimization== | ||
=== | === What and Why? === | ||
BEFORE YOU CONTINUE DO THE FOLLOWING: Load your map and hug/run along ALL the walls. If you clipped or stopped moving at any point, your map needs movement optimization and is not ready for the workshop. | |||
I believe all players can relate to the frustration of being chased around a map only to get stuck or clip on a random prop or map geometry leading to their death. | |||
Movement optimization is based on a general understanding that although in the real-world we have the opportunity to contort our bodies around objects as we move, in the game-world we do not have that luxury due to engine limitations with collisions. Due to this, we have to dedicate some additional time to workaround the limitations of in-game collisions make sure that players don't clip or get stuck on parts of the level. | |||
=== How? === | |||
An extremely comprehensive video tutorial made by Seanchaoz perfectly explains how to optimize movement for your maps: [https://www.youtube.com/watch?v=vb-enruIrR4 KF2 SDK Guide - Basic Movement Optimization] | |||
'''Figure 3.1''' below shows a typical corridor that you may make for your level, on the surface it looks fine but there are a couple of issues that will frustrate players. | |||
These are highlighted in '''Figure 3.2''', we have 4 different situations: | |||
# Small Props that catch the player | |||
# Larger Props that block the path but shouldn't block forward movement | |||
# Props that can stick out that we shouldn't be able to walk | |||
Although some may not immediately seem obvious, if we go to our Flags Menu > Show > Collision Modes > Rigid Body, it will show us the actually collisions of the map and all the props placed. Ideally we want to make sure that no collisions stick out and players move along a smooth surface/wall. '''See Figure 3.3'''. | |||
===Looking For Map Exploits=== | ===Looking For Map Exploits=== | ||
Much like the discussions with movement optimization (especially with situation 3): If it sticks out, a player can stand on it, and they may be able to chain jumping on props to get in positions of exploit where Zeds cannot get to them. You will need to go over your map with a fine-tooth comb to make sure that no props can be used as jumping islands to escape the map or get into positions they shouldn't be in. | |||
Here are a couple of tips to find/fix exploitable spots on your map: | |||
* Make sure ''all'' map boundaries are encompassed by tall collision boxes | |||
* After you've done an initial pass of player movement optimization, go through the whole map in Rigid Body collision mode and see if any props stick out. | |||
* Any props that look like they could provide some sort of ledge, platform or general area that could allow players to stand on - put a collision box around it. | |||
** Even the smallest piece of collision can be used and exploited | |||
* Collision boxes themselves can be used as exploits - so make sure that they either extend to the ceiling or are high enough that players will never be able to reach to tops of them. '''See Figure 3.4'''. | |||
* Spawn yourself in your map with a Double Barrel Shotgun and spend some time alt-fire-jumping against possible exploitable locations all around the map - you may have forgotten one. | |||
** Use: ''enablecheats'', ''god'', ''giveweapon KFGameContent.KFWeap_Shotgun_DoubleBarrel'', ''uberammo'' | |||
* Playtest with friends and ask them to find spots! | |||
** Its always good to have a fresh pair of eyes to spot areas you might've forgotten or didn't notice. | |||
===Fixing Spawns and Pathing=== | ===Fixing Spawns and Pathing=== | ||
Just like how players can get stuck on props, Zeds encounter the same problems, however it is usually with the floors they run on. | |||
==Mesh Merging== | ==Mesh Merging== | ||
| Line 170: | Line 202: | ||
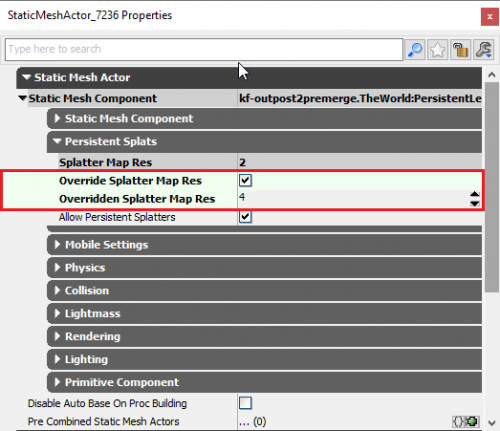
[[File:SplatMapOverride.png|500 px|thumb|'''Figure 6.2:''' Splatter Map Override Properties]] | [[File:SplatMapOverride.png|500 px|thumb|'''Figure 6.2:''' Splatter Map Override Properties]] | ||
{{Col-end}} | {{Col-end}} | ||
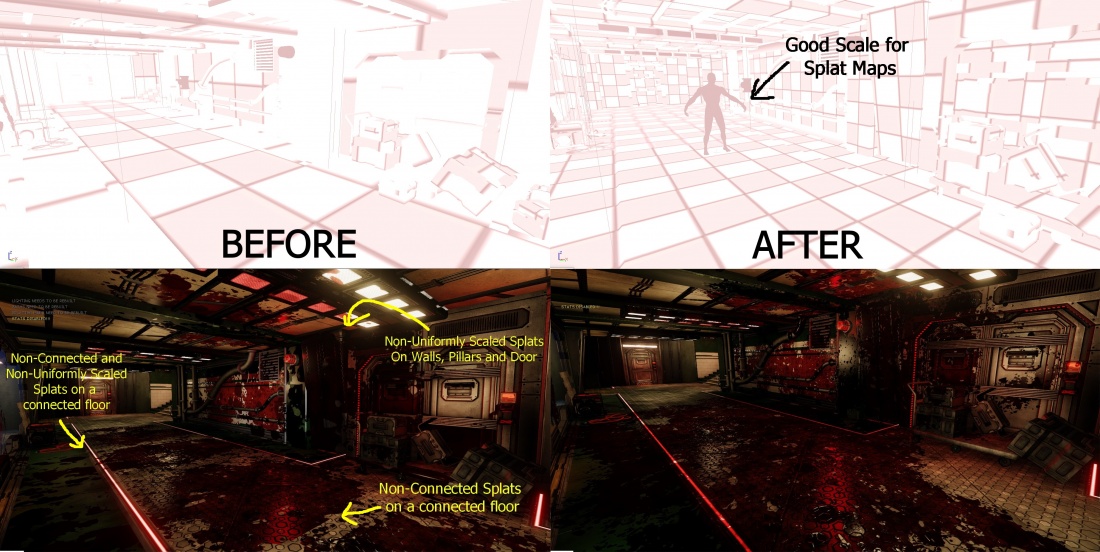
[[File:Splatmapcomparison.jpg|1100 px|thumb|left|'''Figure 6.3:''' Splatter Map Standardization Before and After]]<br clear=all> | [[File:Splatmapcomparison.jpg|1100 px|thumb|left|'''Figure 6.3:''' Splatter Map Standardization Before and After]]<br clear="all"> | ||
==Precomputed Visibility== | ==Precomputed Visibility== | ||
Revision as of 09:09, 11 October 2018
Introduction
This page will give a comprehensive guide to increasing the performance in your map and also optimizing the player experience; looking at such things as making smooth movement around the map, avoiding getting caught on props and general exploit fixing. Its recommended that you read through the entire guide and apply all the principles to your map before you release it on the workshop.
The techniques below are listed in order of the stages you should implement them; starting from being able to apply them at anytime and ending with final/last stage tweaks before publishing a map.
Lighting and Dynamic Shadows
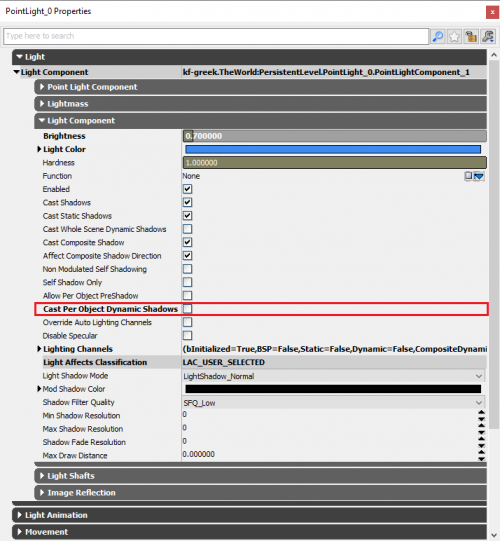
PointLights VS SpotLightsSpotLights perform better than PointLights. SpotLights cast in 1 particular direction, While Pointlights have to cast multiple SpotLights in directions around the entire radius of the sphere (PointLights are 2x more costly in performance; however in saying this - you are able to have many combinations of PointLights and SpotLights without too much of a performance hit). Both lights are affected by the size of the Radius that they have - as you would expect, having a larger radius has a larger impact on performance. It is recommended to adjust the radius size to be just enough to get the desired effect and not to be over generous. You may be able to achieve the same lighting intent with a smaller radius and larger brightness. The PointLight PitfallOne trap a lot of new maps fall into is the unintended over-use and mishandling of dynamic shadows with PointLights. This is not entirely the level designers fault as one particular variable: Cast Per Object Dynamic Shadows is enabled by default. This is located under the PointLight Properties > Light Component > Light Component. See Figure 1.1. You always want to make sure that this variable is DISABLED for any PointLights in your map. NEVER use dynamic shadows with PointLights. Dynamic Shadows should only be reserved for SpotLights. This particular option may not seem problematic when playing in the editor, this is because the performance hit only occurs when there are many actors (Zeds/Players) within the light's radius. Each of these actors will be casting dynamics shadows, which are already quite demanding. During gameplay, you may see huge fluctuations with your FPS based on the action/number of zeds present in the screen within the vicinity of these lights. This performance hit can be magnified quite significantly when you end up having a cluster of PointLights also casting dynamic shadows in the same area. You can easily check and disable this variable on all PointLights on your map by:
Doing this trick alone should see a significant increase in performance if they were previously enabled. SpotLights casting Dynamic ShadowsAs mentioned previously, Dynamic Shadows are quite an intensive features to use in a map. Their performance impact is proportional to the complexity of the geometry of the map and the amount of moving actors (Players and Zeds) that they cast shadows from. Poor performance can be magnified if there are a cluster of SpotLights that cast Dynamic Shadows as well. It's recommended to use them sparingly and to avoid clustering them together. Try to use them to accent certain parts of the map, as opposed to making all SpotLights cast them, as they can have larger visual impact; less is more (eg: Casting shadows from car high-beams/floodlights, using them on alarm systems or around a fireplace - usually locations/lights that are bold and already stick out). |
 |
Mesh Density and Material & Particle Effect Complexity
Movement Optimization
What and Why?
BEFORE YOU CONTINUE DO THE FOLLOWING: Load your map and hug/run along ALL the walls. If you clipped or stopped moving at any point, your map needs movement optimization and is not ready for the workshop.
I believe all players can relate to the frustration of being chased around a map only to get stuck or clip on a random prop or map geometry leading to their death.
Movement optimization is based on a general understanding that although in the real-world we have the opportunity to contort our bodies around objects as we move, in the game-world we do not have that luxury due to engine limitations with collisions. Due to this, we have to dedicate some additional time to workaround the limitations of in-game collisions make sure that players don't clip or get stuck on parts of the level.
How?
An extremely comprehensive video tutorial made by Seanchaoz perfectly explains how to optimize movement for your maps: KF2 SDK Guide - Basic Movement Optimization
Figure 3.1 below shows a typical corridor that you may make for your level, on the surface it looks fine but there are a couple of issues that will frustrate players.
These are highlighted in Figure 3.2, we have 4 different situations:
- Small Props that catch the player
- Larger Props that block the path but shouldn't block forward movement
- Props that can stick out that we shouldn't be able to walk
Although some may not immediately seem obvious, if we go to our Flags Menu > Show > Collision Modes > Rigid Body, it will show us the actually collisions of the map and all the props placed. Ideally we want to make sure that no collisions stick out and players move along a smooth surface/wall. See Figure 3.3.
Looking For Map Exploits
Much like the discussions with movement optimization (especially with situation 3): If it sticks out, a player can stand on it, and they may be able to chain jumping on props to get in positions of exploit where Zeds cannot get to them. You will need to go over your map with a fine-tooth comb to make sure that no props can be used as jumping islands to escape the map or get into positions they shouldn't be in.
Here are a couple of tips to find/fix exploitable spots on your map:
- Make sure all map boundaries are encompassed by tall collision boxes
- After you've done an initial pass of player movement optimization, go through the whole map in Rigid Body collision mode and see if any props stick out.
- Any props that look like they could provide some sort of ledge, platform or general area that could allow players to stand on - put a collision box around it.
- Even the smallest piece of collision can be used and exploited
- Collision boxes themselves can be used as exploits - so make sure that they either extend to the ceiling or are high enough that players will never be able to reach to tops of them. See Figure 3.4.
- Spawn yourself in your map with a Double Barrel Shotgun and spend some time alt-fire-jumping against possible exploitable locations all around the map - you may have forgotten one.
- Use: enablecheats, god, giveweapon KFGameContent.KFWeap_Shotgun_DoubleBarrel, uberammo
- Playtest with friends and ask them to find spots!
- Its always good to have a fresh pair of eyes to spot areas you might've forgotten or didn't notice.
Fixing Spawns and Pathing
Just like how players can get stuck on props, Zeds encounter the same problems, however it is usually with the floors they run on.
Mesh Merging
What and Why?Mesh merging is a step that all level designers should do to their maps as they approach completion. It aims to further enhance the look of your map by combining multiple static meshes on the same plane/axis so that:
It also has the added benefits of increasing performance by:
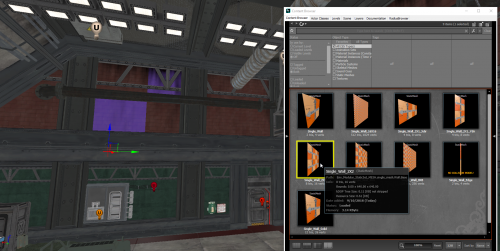
This is because you are now calculating collisions and drawcalls for 1 mesh instead of say 4, 8, 20 and even up to 30+ meshes in some cases. ALL MAPS SHOULD MERGE THEIR MESHES WHERE POSSIBLE How?Before you dive directly into Mesh Merging you should do a preliminary pass over your map to see if you can replace smaller modular kit pieces with larger configurations when possible (e.g. Two 1x1 floor pieces next to each other can be replaced with one 1x2 floor piece). See Figure 4.1. Comprehensive Wiki Guide: Setting Up UV's and Mesh Merging (Killing Floor 2) Community Video (by Seanchaoz): KF2 SDK Tutorial - Combined Meshes |
 |
Setting Render Distance
What and Why?
|
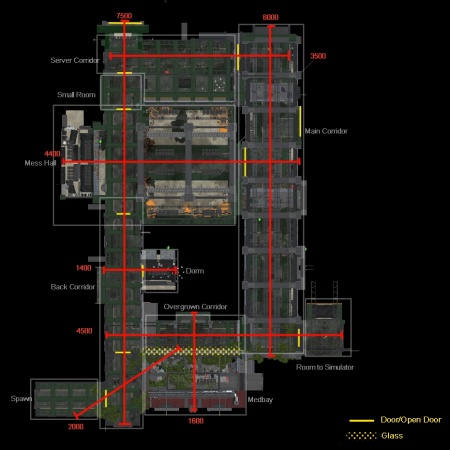
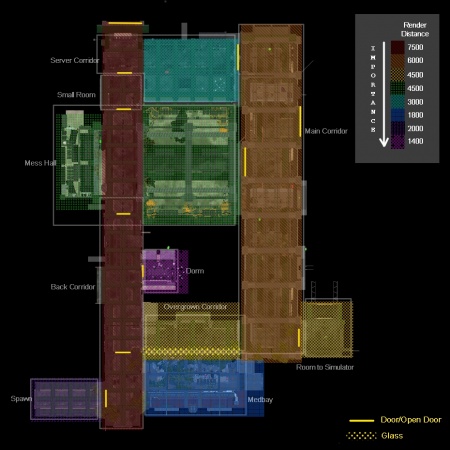
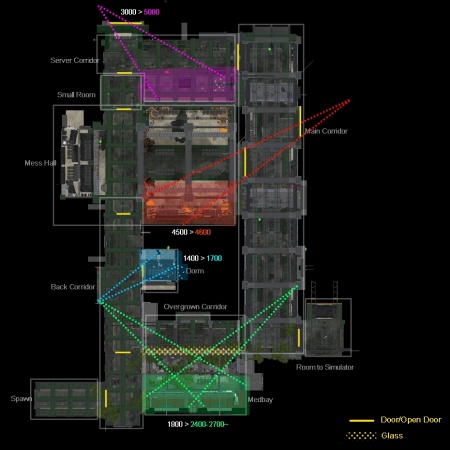
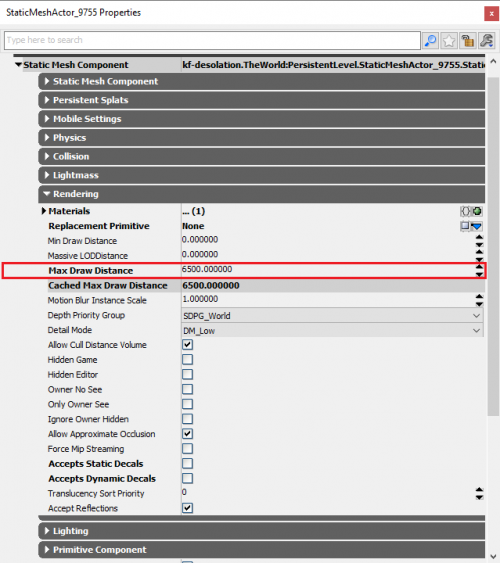
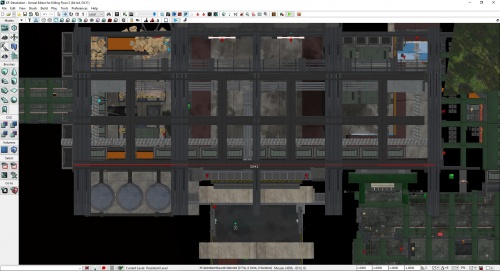
When we aren't looking or cannot see meshes, particle effects, lights or any other actors, it make sense that they should not be rendered on the screen, especially if they are really far away. We can statically set the distances that these actors can render to help improve performance of the map. This saves the Dynamic Occlusion System (discussed below in Precomputed Visibility) from having to determine if the object is still visible or not past a certain distance; ultimately increasing performance. If you cannot implement Precomputed Visibility, you must at very least set proper render distances for ALL actors on your map. This step can be done before or after mesh merging, but I recommend doing it after so you don't have to go through all the other meshes to double check render distances set. How?We can set the render distances on any actors by assigning a value to the Max Draw Distance variable under an actor's Rendering Properties (Lights, StaticMesh, Particle Effects, nearly all render-able actors contain a Rendering category. See Figure 5.1. The value you set for the Max Draw Distance is highly dependent on the mesh's location on the map so you will need to select portions of your map and assign them individually. Here are some general guidelines to help speed up the process:
ExamplesBelow is an example breakdown of a portion of KF-Desolation and how I approached rendering distances and viewing angles.
|
  |
Splatter Map Resolution Standardization
Precomputed Visibility
What and Why?
Precomputed Visibility is a final optimization step that you can add to your map to squeeze the last amount of performance out it. Although we set the mesh and lighting render distances in a previous step, this was only one technique used to help actor culling in our map. By default the maps will use UDK's Dynamic Occlusion System, this is a fine approach in a general sense but it can have a performance cost with calculating what should be culled dynamically while playing. Utilizing Precomputed Visibility will allow us to statically save some occlusion culling around the map to increase performance.
How?
Comprehensive Wiki Guide: Setting Up Precomputed Visibility (Killing Floor 2)
Final Words
All the above techniques are used in Official KF2 maps to optimize the player experience. If you wish to make official quality maps that people would like to play and have good performance, you should implement all techniques discussed on this page.
It may seem like a lot to do, and frankly it is, but this is game development and we have a responsibility to deliver the best experience we can for the players. Personally I find a certain charm and rewarding quality when you see the performance of your map increase, even by a little bit.
Best of luck to all those who strive for the best out of their work! -Delta
