Setting WWise Audio Modding: Difference between revisions
Jump to navigation
Jump to search
| Line 23: | Line 23: | ||
===Creating New Content in Wwise=== | ===Creating New Content in Wwise=== | ||
# Create a new Work Unit for Audio | #Create a new Work Unit for Audio | ||
## Right Click on “Actor-Mixer Hierarchy” | ##Right Click on “Actor-Mixer Hierarchy” | ||
## Navigate to “New Child” | ##Navigate to “New Child” | ||
## Select “Work Unit” Name Work Unit | ##Select “Work Unit” Name Work Unit | ||
# Add Sound FX to Wwise | #Add Sound FX to Wwise | ||
## Drag sound file you wish on top of the Work Unit | ##Drag sound file you wish on top of the Work Unit | ||
## Click “Import” button | ##Click “Import” button | ||
# Set the properties of your sound. | #Set the properties of your sound. | ||
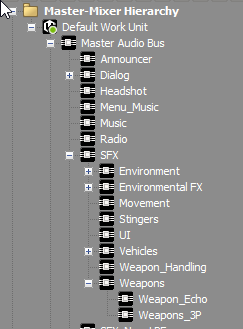
## Set the output bus to the appropriate bus. If you are creating a 1st person weapon sound the appropriate bus would be “Weapons”[[File:MasterMixerHierarchy.png|center|thumb|Step 3.1]] | ##Set the output bus to the appropriate bus. If you are creating a 1st person weapon sound the appropriate bus would be “Weapons”[[File:MasterMixerHierarchy.png|center|thumb|Step 3.1]] | ||
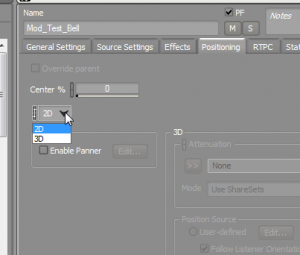
## Under the “Positioning”tab set the sound to 2D or 3D via the drop down[[File:PositioningTab.png|center|thumb|Step 3.2]] | ##Under the “Positioning”tab set the sound to 2D or 3D via the drop down[[File:PositioningTab.png|center|thumb|Step 3.2]] | ||
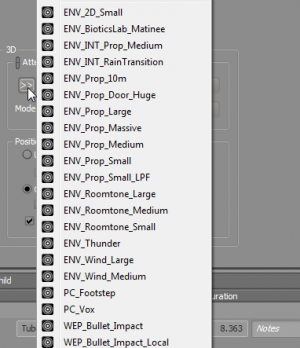
## If you are creating a 3D sound you will need to set it’s positioning information. There are many presets in the project that should suit your needs[[File:PositioningPresets.png|center|thumb]] | ##If you are creating a 3D sound you will need to set it’s positioning information. There are many presets in the project that should suit your needs[[File:PositioningPresets.png|center|thumb]] | ||
# Create an Event for your sound | #Create an Event for your sound | ||
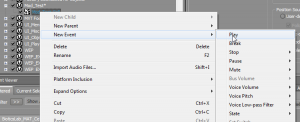
## Right click your new sound and select “New Event” and then “Play” | ##Right click your new sound and select “New Event” and then “Play”[[File:NewEventAndPlay.png|center|thumb]] | ||
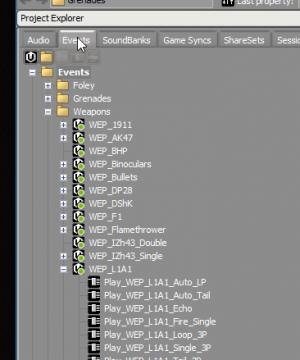
## Click the “Events” tab in the upper left corner | ##Click the “Events” tab in the upper left corner[[File:EventsTab.png|center|thumb]] | ||
##Follow the same steps as above to create a new “Work Unit” here | |||
##Your new Event will be located in the “Default Work Unit”. You can cut and paste or drag it to your new Work Unit (or an existing work unit)[[File:DefaultWorkUnitSetting.png|center|thumb]] | |||
##Save your project! | |||
## | ## | ||
Revision as of 15:16, 3 January 2019

Setting Up Wwise for KF2
Register an account with Audiokinetic here
Create a non-commercial project with over 200 sounds. Make sure to include the words KF2 Mod in the title and description.
You will need to go to the “older versions” area of downloads here.
They will give you a license key that will get you full access to everything needed for KF2 Modding.
- Download correct Wwise SDK - 2015.1.9 build 5624
- Download Wwise Project located here
- Place the contents of this folder here: “steamapps\common\killingfloor2\KFGame\Content\Packages\Audio\WWISE”
- Install Wwise SDK (Common) and (Windows), Authoring Data, and Authoring Binaries
- Set the correct bank output path in Wwise
- Navigate to Project-Project Settings
- Click the “SoundBanks” tab
- Set the Windows Platform “SoundBank Folder” path to the folder where your brewed game files live killingfloor2\KFGame\BrewedPC\WwiseAudio\Windows
- If you want to create brand new banks this will require manually moving them to the \BrewedPC\WwiseAudio\Windows folder.
- NEW STATES WILL NOT WORK WITHOUT COMPILING SOURCE. Modders must use existing States.
Creating New Content in Wwise
- Create a new Work Unit for Audio
- Right Click on “Actor-Mixer Hierarchy”
- Navigate to “New Child”
- Select “Work Unit” Name Work Unit
- Add Sound FX to Wwise
- Drag sound file you wish on top of the Work Unit
- Click “Import” button
- Set the properties of your sound.
- Set the output bus to the appropriate bus. If you are creating a 1st person weapon sound the appropriate bus would be “Weapons”
Step 3.1 - Under the “Positioning”tab set the sound to 2D or 3D via the drop down
Step 3.2 - If you are creating a 3D sound you will need to set it’s positioning information. There are many presets in the project that should suit your needs
- Set the output bus to the appropriate bus. If you are creating a 1st person weapon sound the appropriate bus would be “Weapons”
- Create an Event for your sound
- Right click your new sound and select “New Event” and then “Play”
- Click the “Events” tab in the upper left corner
- Follow the same steps as above to create a new “Work Unit” here
- Your new Event will be located in the “Default Work Unit”. You can cut and paste or drag it to your new Work Unit (or an existing work unit)

- Save your project!
- Right click your new sound and select “New Event” and then “Play”


