Bloat (Killing Floor 2): Difference between revisions
No edit summary |
m (cleaned up the page a bit, made intro meatier, not a lot fundamentally changed) |
||
| (6 intermediate revisions by one other user not shown) | |||
| Line 1: | Line 1: | ||
[[File:Zed StatsSheet Bloat.jpg|right|frameless|600x600px|The Bloat]] | [[File:Zed StatsSheet Bloat.jpg|right|frameless|600x600px|The Bloat]]The '''Bloat''' is an uncommon specimen in Killing Floor 2. They appear as naked, incredibly obese males that wield 2 large cleavers in their hands, with bile flowing down from their mouth. | ||
The '''Bloat''' is an uncommon specimen in Killing Floor 2. It is classified as a medium enemy | |||
It is classified as a medium enemy, their main purpose being to conceal smaller specimen and to act as a literal meatshield. Though they are slow and present an easy target, do not let them get close: they are difficult to take down when in close quarters, their cleavers deal heavy damage, and their bile both deals lasting damage and obscures vision when hit. | |||
[[Category:KF2]] | |||
==Base Statistics== | ==Base Statistics== | ||
| Line 58: | Line 60: | ||
| colspan="4" rowspan="1" |<small>Puke Mine (damage)</small> | | colspan="4" rowspan="1" |<small>Puke Mine (damage)</small> | ||
| colspan="2" rowspan="1" |<small>15</small> | | colspan="2" rowspan="1" |<small>15</small> | ||
|- | |||
| colspan="4" rowspan="1" |<small>Puke Mine (explosion radius)</small> | |||
| colspan="2" rowspan="1" |<small>200 (2 meters)</small> | |||
|- | |- | ||
| colspan="4" rowspan="1" |<small>Puke Mine (falloff exponent)</small> | | colspan="4" rowspan="1" |<small>Puke Mine (falloff exponent)</small> | ||
| Line 63: | Line 68: | ||
|- | |- | ||
| colspan="4" rowspan="1" |<small>Puke Mine (health)</small> | | colspan="4" rowspan="1" |<small>Puke Mine (health)</small> | ||
| colspan="2" rowspan="1" |<small> | | colspan="2" rowspan="1" |<small>50</small> | ||
|- | |- | ||
| colspan="4" rowspan="1" |<small>Puke Mine (lifetime)</small> | | colspan="4" rowspan="1" |<small>Puke Mine (lifetime)</small> | ||
| colspan="2" rowspan="1" |<small>300s</small> | | colspan="2" rowspan="1" |<small>300s</small> | ||
|- | |- | ||
| colspan="4" rowspan="1" |<small>Puke Mine does the same damage at all difficulties</small> | | colspan="4" rowspan="1" |<small>Puke Mine does the same damage at all difficulties</small> | ||
| Line 99: | Line 101: | ||
==Speed== | ==Speed== | ||
Bloats move slowly when docile, and sprint up close.<br />Movement speed is randomized within ± 10% range and further modified by a multiplier based on difficulty. | Bloats move slowly when docile, and sprint when up close.<br />Movement speed is randomized within ± 10% range and further modified by a multiplier based on difficulty. | ||
{| class="wikitable" | {| class="wikitable" | ||
|<small>Walking speed (per difficulty)</small> | |<small>Walking speed (per difficulty)</small> | ||
| Line 122: | Line 124: | ||
===Damage Resistance=== | ===Damage Resistance=== | ||
Bloats boast a wide array of resistances to all damage types and only neutral to fire | Bloats boast a wide array of resistances to all damage types and are only neutral to fire weapons. | ||
{| class="wikitable" | {| class="wikitable" | ||
! | ! | ||
| Line 131: | Line 133: | ||
!<small>Fire</small> | !<small>Fire</small> | ||
!<small>Microwave</small> | !<small>Microwave</small> | ||
!<small>[[HRG Teslauncher|HRGTeslauncher]]</small> | |||
!<small>Explosives</small> | !<small>Explosives</small> | ||
!<small>Freeze</small> | !<small>Freeze</small> | ||
![[Mechanics_(Killing_Floor_2)#Weapons_-_Ballistic-explosive_tracing|<small>Shells</small>]] | ![[Mechanics_(Killing_Floor_2)#Weapons_-_Ballistic-explosive_tracing|<small>Shells</small>]] | ||
!<small>[[Hemogoblin|Bleeding]]</small> | |||
!<small>EMP</small> | |||
|- | |- | ||
!<small>Damage Multipler</small> | !<small>Damage Multipler</small> | ||
| Line 142: | Line 147: | ||
|<small>x1</small> | |<small>x1</small> | ||
|<small>x0.8</small> | |<small>x0.8</small> | ||
|<small>x0.58</small> | |||
|<small>x0.5</small> | |<small>x0.5</small> | ||
|<small>x1</small> | |||
|<small>x1</small> | |||
|<small>x1</small> | |<small>x1</small> | ||
|<small>x1</small> | |<small>x1</small> | ||
| Line 149: | Line 157: | ||
===Ballistic Resistance=== | ===Ballistic Resistance=== | ||
Bloats are greatly resistant to all ballistic weaponry. The Bloat also has special resistance values for specific weapons. | Bloats are greatly resistant to all ballistic weaponry. The Bloat also has special resistance values for specific weapons: the AR-15 Varmint Rifle and the 9mm Handgun, which are lower than their respective damage types. | ||
{| class="wikitable" | {| class="wikitable" | ||
! | ! | ||
| Line 157: | Line 165: | ||
!<small>Handgun</small> | !<small>Handgun</small> | ||
!<small>Rifle</small> | !<small>Rifle</small> | ||
!<small>Assault Rifle - | !<small>Assault Rifle - AR-15</small> | ||
!<small>Handgun - | !<small>Handgun - 9mm</small> | ||
|- | |- | ||
!<small>Damage Multiplier</small> | !<small>Damage Multiplier</small> | ||
| Line 172: | Line 180: | ||
===Hitzones=== | ===Hitzones=== | ||
Bloats only have one weak [[Mechanics_(Killing_Floor_2)#ZEDs_-_Hitzones|spot]], which is the head, | Bloats only have one weak [[Mechanics_(Killing_Floor_2)#ZEDs_-_Hitzones|spot]], which is the head, though the multiplier is minuscule. Their cleavers deflect attacks. | ||
{| class="wikitable" | {| class="wikitable" | ||
! | ! | ||
| Line 324: | Line 332: | ||
==Behavior== | ==Behavior== | ||
The Bloat is a large, tanky, | The Bloat is a large, tanky, and slow-moving close-range ZED. | ||
Upon spawning, it will walk or sprint towards the nearest player and attempt to attack them. | |||
Bloats will mainly attack by spitting acidic bile at players as soon as they get within range, and will occasionally hack at them with their cleavers in-between bile attacks. | |||
Bloat bile will blind players when they are hit, splattering their screen with varying amounts of bile that depends on how much armor and toxic resistance they have. It will also continue to deal damage over time after the initial hit for a few seconds. | |||
Bloat bile will destroy armor extremely fast, and continues to chip away at armor for a few seconds after the initial hit. | |||
Bloats will leave behind explosive "bile mines" when killed through sheer body damage. They will not leave behind mines if they are killed via decapitation or fire. The number of bile mines they leave behind increases based on difficulty. | |||
Bloats can block gunfire when shot at, crossing their cleavers in front of their face. When blocking, Bloats take 20% less damage from all attacks, not just ones directed at the cleaver, and incapacitating effects are 80% less effective. On Suicidal and Hell On Earth, Bloats have a very high chance to block when shot at, but it's not guaranteed. | |||
On Suicidal and Hell On Earth, Bloats gain the ability to sprint forward while spitting bile, drastically increasing their range. Bloats can also spit bile into the air around them like a fountain, dealing damage all around them. | |||
==Miscellaneous Information== | ==Miscellaneous Information== | ||
Teleportation: | [[Mechanics (Killing Floor 2)#ZEDs - Teleportation|Teleportation]]: | ||
{| class="wikitable" | {| class="wikitable" | ||
|<small>Frustration delay</small> | |<small>Frustration delay</small> | ||
| Line 347: | Line 369: | ||
Miscellaneous: | Miscellaneous: | ||
{| class="wikitable" | {| class="wikitable" | ||
|<small>Penetration resistance</small> | |<small>[[Mechanics (Killing Floor 2)#Weapons - Penetration power|Penetration]] resistance</small> | ||
| colspan="6" rowspan="1" |3 | | colspan="6" rowspan="1" |3 | ||
|- | |- | ||
| Line 364: | Line 386: | ||
*Visual effect of the bloat bile lasts for 10 seconds and slowly fades out. Wearing armor prevents player from having the "pulse" effect. | *Visual effect of the bloat bile lasts for 10 seconds and slowly fades out. Wearing armor prevents player from having the "pulse" effect. | ||
*Amount of the puke mines to spawn on death: Normal - 0, Hard - 1, Suicidal - 3, HOE - 3. In PvP games AI Bloats does not spawn puke mines, player-controlled Bloats spawn 3 of them. | *Amount of the puke mines to spawn on death: Normal - 0, Hard - 1, Suicidal - 3, HOE - 3. In PvP games AI Bloats does not spawn puke mines, player-controlled Bloats spawn 3 of them. | ||
*Puke mines only | *Puke mines will only spawn if Bloat's body has exploded on death. | ||
*(PvP) Rally boost: forces AI Bloats to sprint, players do x1.2 more damage. | *(PvP) Rally boost: forces AI Bloats to sprint, players do x1.2 more damage. | ||
*Damage to doors (possible values) = 14 / 112. | *Damage to doors (possible values) = 14 / 112. | ||
| Line 375: | Line 397: | ||
==Extermination Tactics== | ==Extermination Tactics== | ||
Bloats are extremely durable as their purpose is to serve as | Bloats are extremely durable as their purpose is to serve as body shields for the other ZEDs. They present an easy target for headshots and are cripplingly weak to flame weapons, making [[Sharpshooter (Killing Floor 2)|Sharpshooters]], [[Gunslinger|Gunslingers]], and [[Firebug (Killing Floor 2)|Firebug]]<nowiki/>s very effective at killing Bloats, though any class can kill them easily. Weaker weapons will require multiple headshots, while higher end weapons will only take one or two. [[Demolitionist (Killing Floor 2)|Demolitionists]] may find dealing with Bloats very annoying due to the explosive nature of their weapons and the tankiness of their body. | ||
Bloats are slow and will rarely sprint, so it's safe to ignore them for some time to focus on killing other threats. They tend to hide more dangerous ZEDs from view, such as groups of [[Gorefast_(Killing_Floor_2)|Gorefasts]], [[Husk_(Killing_Floor_2)|Husks]], and especially [[Siren_(Killing_Floor_2)|Sirens]]. However, do not let the Bloat get into spitting distance or it can cause high area of effect damage as well as destroy armor very quickly. | |||
Bloats have high body health, so it is extremely ammo inefficient to kill them via bodyshots or explosives. Furthermore, killing them via bodyshots make them explode and leave behind bile mines, which explode when stepped on and deal massive toxic damage to players.Take them out with headshots or with fire/microwaves to avoid this. | |||
It is tricky to engage the Bloat in melee range as a [[Berserker_(Killing_Floor_2)|Berserker]] without getting spat on. Let your ranged teammates deal with them or, if you're truly desperate, try moving forward then backing off to bait out their spit, before going in for the killing blow. | |||
While Bloats can block headshots, the cleavers are small and it is very easy to shoot past them. Bloats usually do not drop dead immediately upon decapitation. Their headless bodies will continue to wobble around as they bleed out, and other ZEDs can still hide behind the dying Bloat's body until it dies. | |||
At close range, the [[Firebug_(Killing_Floor_2)|Firebug]] can kill Bloats very quickly as Bloats are vulnerable to fire. The Firebug can safely kill Bloats via body damage without causing it to explode and leave bile mines on the ground. Bloats will drop dead immediately upon having their HP burnt out. | |||
If there are bile mines on the map, you can destroy them by shooting at them. Beware though, as they will explode when destroyed; make sure no teammates are standing nearby when you shoot them. Bile mines disappear upon clearing the wave. | |||
==Gallery== | ==Gallery== | ||
| Line 381: | Line 415: | ||
<gallery mode="packed" heights="275"> | <gallery mode="packed" heights="275"> | ||
File:BloatKF2.png|The Bloat | File:BloatKF2.png|The Bloat | ||
File:BioLabs-Bloat.jpg|Another image | |||
File:Monsterball-Bloat.jpg|Halloween Horrors event variant | |||
File:Kf2 bloat gallery 1.png|alt=Artbook|Artbook concept | File:Kf2 bloat gallery 1.png|alt=Artbook|Artbook concept | ||
File:Kf2 bloat gallery 2.png|alt=Artbook|Artbook renders | File:Kf2 bloat gallery 2.png|alt=Artbook|Artbook renders | ||
Latest revision as of 09:25, 14 December 2020

The Bloat is an uncommon specimen in Killing Floor 2. They appear as naked, incredibly obese males that wield 2 large cleavers in their hands, with bile flowing down from their mouth.
It is classified as a medium enemy, their main purpose being to conceal smaller specimen and to act as a literal meatshield. Though they are slow and present an easy target, do not let them get close: they are difficult to take down when in close quarters, their cleavers deal heavy damage, and their bile both deals lasting damage and obscures vision when hit.
Base Statistics
| Normal | Hard | Suicidal | Hell on earth | |
|---|---|---|---|---|
| Kill Reward | 17 | 17 | 17 | 17 |
| XP | 17 | 22 | 30 | 34 |
| Health (body) | 303 | 405 | 486 | 526 |
| Health (head) | 56 | 75 | 78 | 82 |
For kill reward calculations read Dosh Mechanics.
Attacks
| Body explosion (damage) | 12 | ||||
| Body explosion (radius) | 500 | ||||
| Melee (base damage) | 14 | ||||
| Melee (damage multipliers vs. doors) | 8/10 | ||||
| Melee (damage multipliers vs. players) | 0.4/0.5/0.75/1 | ||||
| Melee (range) | 250 | ||||
| Puke Mine (damage) | 15 | ||||
| Puke Mine (explosion radius) | 200 (2 meters) | ||||
| Puke Mine (falloff exponent) | 0 (none) | ||||
| Puke Mine (health) | 50 | ||||
| Puke Mine (lifetime) | 300s | ||||
| Puke Mine does the same damage at all difficulties | yes | ||||
| Vomit (damage) | 12 | ||||
| Vomit (range) | 350 | ||||
| Vomit poison (DOT duration) | 12s | ||||
| Vomit poison (DOT interval) | 1s | ||||
| Vomit poison (DOT scale, of base damage) | x0.083 | ||||
The base damage value further modified by the difficulty-specific multipliers.
XP Notes
- Killing with weapons other than your current perk grants the XP to the perk that weapons belongs to.
- Damaging with on-perk weapons and then finishing it off with an off-perk weapon divides the XP and grants it to both perks.
- Assist kills grants full XP.
Speed
Bloats move slowly when docile, and sprint when up close.
Movement speed is randomized within ± 10% range and further modified by a multiplier based on difficulty.
| Walking speed (per difficulty) | (135 - 165) x (0.9 / 0.95 / 0.95 / 0.95) x (1 / 1 / 1 / 1) | |||||
| Running speed (per difficulty) | (189 - 231) x (0.9 / 0.95 / 0.95 / 0.95) x (1 / 1 / 1 / 1) | |||||
| Hidden speed | 600 | |||||
| Sprint chance | Normal - 0 / Hard - 0 / Suicidal - 0.1 / HOE - 0.3 | |||||
| Sprint chance (when damaged) | Normal - 0 / Hard - 0 / Suicidal - 0.1 / HOE - 0.5 | |||||
For comparison, by default a healthy player character with the minimal weight walks at speed of 383 units/s, and sprints at speed of 460 units/s.
Sprint Conditions
Should sprint if can sprint OR (if can sprint when damaged AND damaged) (i.e. if sprint chance met its value) AND if distance to player laying between 5.2 and 12 meters (520 units < distance < 1200 units). Should sprint when frustrated.
Resistances and Weaknesses
Damage Resistance
Bloats boast a wide array of resistances to all damage types and are only neutral to fire weapons.
| Piercing | Slashing | Bludgeon | Toxic | Fire | Microwave | HRGTeslauncher | Explosives | Freeze | Shells | Bleeding | EMP | |
|---|---|---|---|---|---|---|---|---|---|---|---|---|
| Damage Multipler | x0.25 | x0.3 | x0.3 | x0.25 | x1 | x0.8 | x0.58 | x0.5 | x1 | x1 | x1 | x1 |
Ballistic Resistance
Bloats are greatly resistant to all ballistic weaponry. The Bloat also has special resistance values for specific weapons: the AR-15 Varmint Rifle and the 9mm Handgun, which are lower than their respective damage types.
| Sub-machine Gun | Assault Rifle | Shotgun | Handgun | Rifle | Assault Rifle - AR-15 | Handgun - 9mm | |
|---|---|---|---|---|---|---|---|
| Damage Multiplier | x0.35 | x0.35 | x0.25 | x0.35 | x0.30 | x0.40 | x0.65 |
Hitzones
Bloats only have one weak spot, which is the head, though the multiplier is minuscule. Their cleavers deflect attacks.
| Damage Multiplier | |
|---|---|
| Head | x1.0001 |
| Cleavers | x0.2 |
| All other | x1 |
Incapacitation Resistance
| Affliction: | Stun | Knockdown | Stumble | Gun hit | Melee hit | Snare |
|---|---|---|---|---|---|---|
| Torso vulnerability: | x0.5 | x1 | x0.4 | x0.35 | x2 | x1 |
| Head vulnerability: | x1 | x1 | x0.4 | x0.35 | x2 | x1 |
| Legs vulnerability: | x0.5 | x1 | x0.4 | x0.35 | x2 | x1 |
| Arms vulnerability: | x0.5 | x1 | x0.4 | x0.35 | x2 | x1 |
| Special zone vulnerability: | x0.5 | x1 | x0.4 | x0.35 | x2 | x1 |
| - Incap cooldown | 1.5s | 1s | 1s | 0.1s | 0.3s | 5.5s |
| - Incap duration | 1.5s | --- | --- | --- | --- | 3s |
| - Dissipation rate | -20/s | -20/s | -20/s | -20/s | -20/s | -20/s |
| - Incap threshold | 100 | |||||
| Affliction: | Poison | Microwave | Fire panic | EMP | Freeze | Bleed |
| - Vulnerability | x0.15 | x4 | x1 | x2.5 | x1 | x1 |
| - Incap cooldown | 20.5s | 5s | 5s | 5s | 3s | --- |
| - Incap duration | 5s | 8s | 3.7s | 3s | 2s | --- |
| - Dissipation rate | -10/s | -20/s | -10/s | -50/s | -20/s | -20/s |
| - Incap threshold | 100 (EMP Disrupt - 25, Bleed - 65) | |||||
| Knockdown (getup duration) | 3.87s | |||||
| Stun (time + wakeup duration) | 1.5s + 2.2s, for PvP ZEDs - 1.5s + 2.2s | |||||
| Freeze (time + thaw duration) | 2s + 2.2s, for PvP ZEDs - 0.5s + 2.2s | |||||
| Stumble (duration) | Between (1.27-1.8)s | |||||
| Parry (duration) | Between (1.33-1.53)s | |||||
Behavior
The Bloat is a large, tanky, and slow-moving close-range ZED.
Upon spawning, it will walk or sprint towards the nearest player and attempt to attack them.
Bloats will mainly attack by spitting acidic bile at players as soon as they get within range, and will occasionally hack at them with their cleavers in-between bile attacks.
Bloat bile will blind players when they are hit, splattering their screen with varying amounts of bile that depends on how much armor and toxic resistance they have. It will also continue to deal damage over time after the initial hit for a few seconds.
Bloat bile will destroy armor extremely fast, and continues to chip away at armor for a few seconds after the initial hit.
Bloats will leave behind explosive "bile mines" when killed through sheer body damage. They will not leave behind mines if they are killed via decapitation or fire. The number of bile mines they leave behind increases based on difficulty.
Bloats can block gunfire when shot at, crossing their cleavers in front of their face. When blocking, Bloats take 20% less damage from all attacks, not just ones directed at the cleaver, and incapacitating effects are 80% less effective. On Suicidal and Hell On Earth, Bloats have a very high chance to block when shot at, but it's not guaranteed.
On Suicidal and Hell On Earth, Bloats gain the ability to sprint forward while spitting bile, drastically increasing their range. Bloats can also spit bile into the air around them like a fountain, dealing damage all around them.
Miscellaneous Information
| Frustration delay | Random (2.5-5)s | |||||
| Disabled, when total AI remains | 12 | |||||
| Cooldown | cannot teleport | |||||
| When hidden, can use after | cannot teleport | |||||
| When spawned, can use after | cannot teleport | |||||
Miscellaneous:
| Penetration resistance | 3 | |||||
| Parry resistance | 3 | |||||
| AI pause, on gun / melee hit | 0.85s | |||||
Various information:
- Bloat cannot teleport.
- Bloat can strike through the other ZEDs.
- Bloat Bile has Poison power of 0.
- Unlike normal vomit attack, vomit damage of the body explosion does not scale with game difficulty. It is always 12 points of damage.
- Visual effect of the bloat bile lasts for 10 seconds and slowly fades out. Wearing armor prevents player from having the "pulse" effect.
- Amount of the puke mines to spawn on death: Normal - 0, Hard - 1, Suicidal - 3, HOE - 3. In PvP games AI Bloats does not spawn puke mines, player-controlled Bloats spawn 3 of them.
- Puke mines will only spawn if Bloat's body has exploded on death.
- (PvP) Rally boost: forces AI Bloats to sprint, players do x1.2 more damage.
- Damage to doors (possible values) = 14 / 112.
- ZED mass = 130.
- Should sprint if can sprint OR (if can sprint when damaged AND damaged) (i.e. if sprint chance met its value) AND if distance to player laying between 5.2 and 12 meters (520 units < distance < 1200 units). Should sprint when frustrated.
- Bloat has a chance to block upon taking damage or when being aimed at. Bloat has a chance to block or evade certain damage sources.
- Chance to block after taking damage: Normal - 0, Hard - 0.1, Suicidal - 0.65, HOE - 0.85. Health loss percentage to trigger block: all difficulties - 0.1. Block chains (max): Hard - 4, Suicidal - 5, HOE - 8. Block duration - 1.25s, cooldown - 3.5s.
- When blocking. Damage resistance: Melee attacks - x0.9, Gun attacks - x0.9. Affliction multiplier - x0.2 (ZED takes only 20% of all incoming powers). Solo game block chance multiplier: Hard, Suicidal - x0.1, HOE - x0.2.
Extermination Tactics
Bloats are extremely durable as their purpose is to serve as body shields for the other ZEDs. They present an easy target for headshots and are cripplingly weak to flame weapons, making Sharpshooters, Gunslingers, and Firebugs very effective at killing Bloats, though any class can kill them easily. Weaker weapons will require multiple headshots, while higher end weapons will only take one or two. Demolitionists may find dealing with Bloats very annoying due to the explosive nature of their weapons and the tankiness of their body.
Bloats are slow and will rarely sprint, so it's safe to ignore them for some time to focus on killing other threats. They tend to hide more dangerous ZEDs from view, such as groups of Gorefasts, Husks, and especially Sirens. However, do not let the Bloat get into spitting distance or it can cause high area of effect damage as well as destroy armor very quickly.
Bloats have high body health, so it is extremely ammo inefficient to kill them via bodyshots or explosives. Furthermore, killing them via bodyshots make them explode and leave behind bile mines, which explode when stepped on and deal massive toxic damage to players.Take them out with headshots or with fire/microwaves to avoid this.
It is tricky to engage the Bloat in melee range as a Berserker without getting spat on. Let your ranged teammates deal with them or, if you're truly desperate, try moving forward then backing off to bait out their spit, before going in for the killing blow.
While Bloats can block headshots, the cleavers are small and it is very easy to shoot past them. Bloats usually do not drop dead immediately upon decapitation. Their headless bodies will continue to wobble around as they bleed out, and other ZEDs can still hide behind the dying Bloat's body until it dies.
At close range, the Firebug can kill Bloats very quickly as Bloats are vulnerable to fire. The Firebug can safely kill Bloats via body damage without causing it to explode and leave bile mines on the ground. Bloats will drop dead immediately upon having their HP burnt out.
If there are bile mines on the map, you can destroy them by shooting at them. Beware though, as they will explode when destroyed; make sure no teammates are standing nearby when you shoot them. Bile mines disappear upon clearing the wave.
Gallery
-
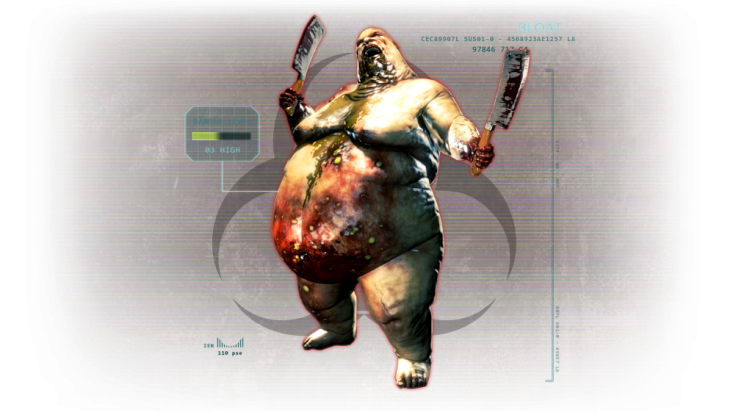
The Bloat
-
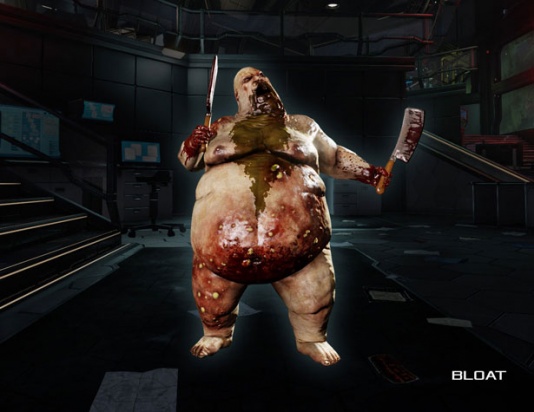
Another image
-
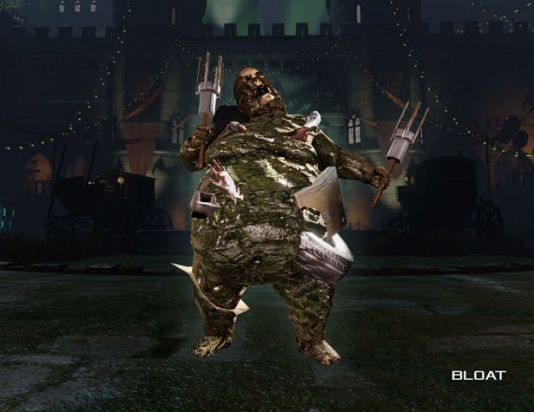
Halloween Horrors event variant
-
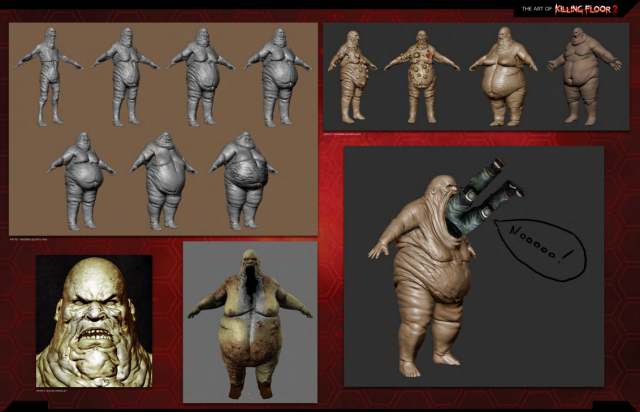
Artbook concept
-
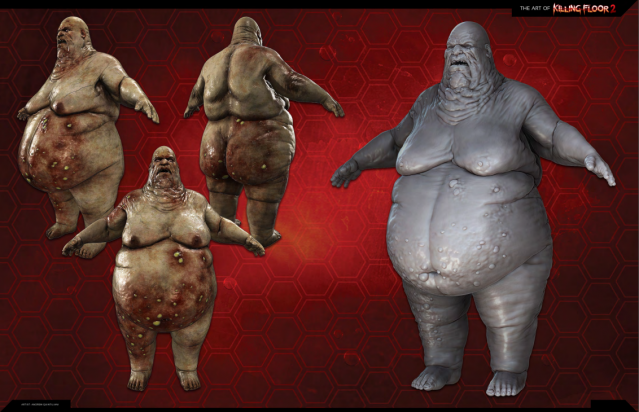
Artbook renders


